I was a surfer long before I was a yogi.
But since I’ve become committed to a regular yoga practice - almost 10 years ago now! - I’ve noticed that yoga has greatly enhanced my overall surfing experience. There are many reasons why a regular yoga practice is beneficial for surfers, but I think a really awesome thing about the practice is that those reasons can be quite unique to each of us individually…
From my own experience, I’ve found that yoga has really helped me release tension and open up into areas of my body that tend to get tight and sore from a lot of surfing, like the low back, hips, shoulders, and chest. I’ve also found that yoga has helped me to develop a core strength and awareness that extends far beyond doing a lot of crunches or holding challenging postures. Instead, it’s more of an awareness of “moving from my center” and using my deep, stabilizing muscles to support me in moving more efficiently and, hopefully, without injury.
My practice inspires feelings of connection and foundation and fluidity within my body. Physically, I feel like yoga helps my body to more easily adapt to, and bounce-back from, the awkward shapes and situations I encounter in the water, and mentally, I feel like my practice helps me to do the same. As surfers we know that an ability to remain calm during uncomfortable or challenging moments is paramount to spending time in the ocean, and my practice has definitely helped me to strengthen this ability.
Obviously this is a topic we could go on and explore for a while (yay content for the blog!), and my own practice is constantly shifting and evolving as I do, but below I’ve outline my 6 favorite poses (as of late) to practice on the regular to counteract the repetitive movements and strenuous work of surfing. Let these poses encourage a healthy balance of strength and flexibility throughout your body. They can be practiced on their own, strung together in a short (but oh-so-sweet) sequence, or incorporated into a longer flow.
I’ve also offered a few notes, images, and modifications below, but remember: You’re your own greatest teacher, so stay present to your breath and the sensations of your body. Keep your breath slow and steady, in and out through the nose. If you notice yourself holding your breath (or breathing rapidly), that’s usually a sign that you’ve taken the pose a little too far. If you notice that happen, simply back off. Same goes with sensations - let them be feedback! We are going for some sensation in the tissues to get them to re-lengthen and re-adapt, but nothing too intense that it takes your breath away or elicits a sharp, shooting pain. If you do ever experience any sharp, shooting pains within a pose - back off.
Think about working with yourself instead of working against yourself :)
I hope you enjoy, and let me know how they work for you!
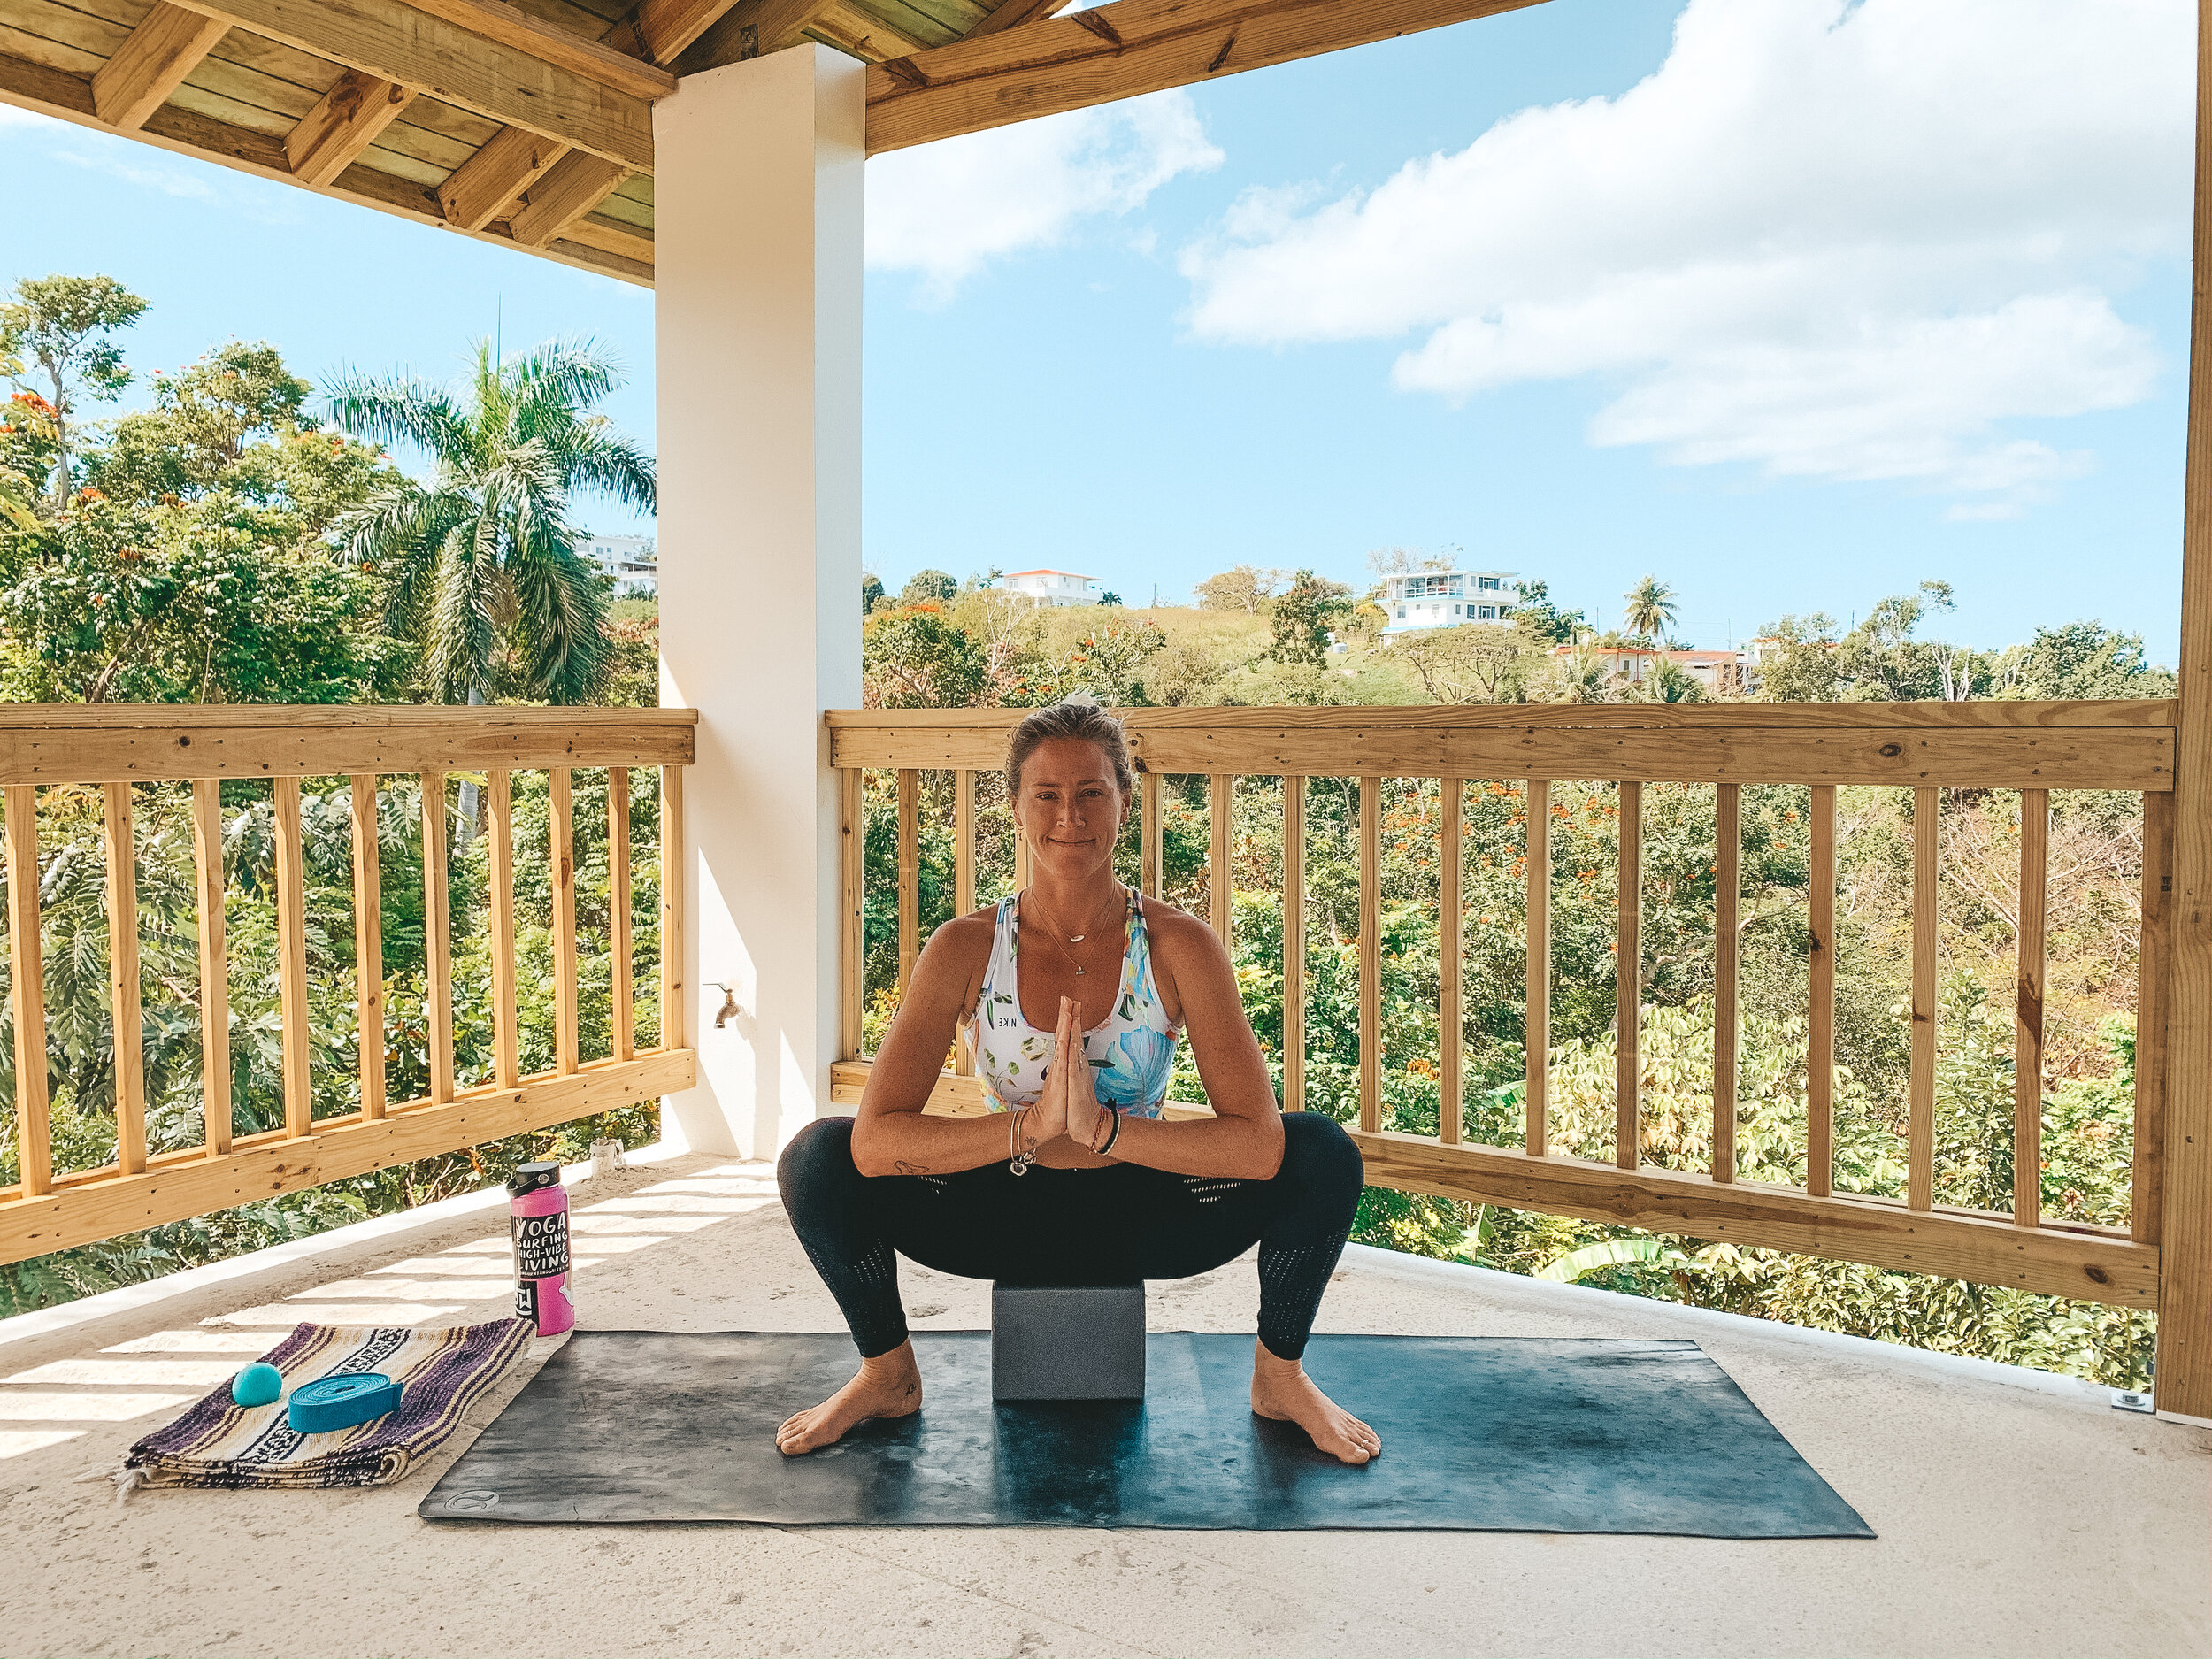
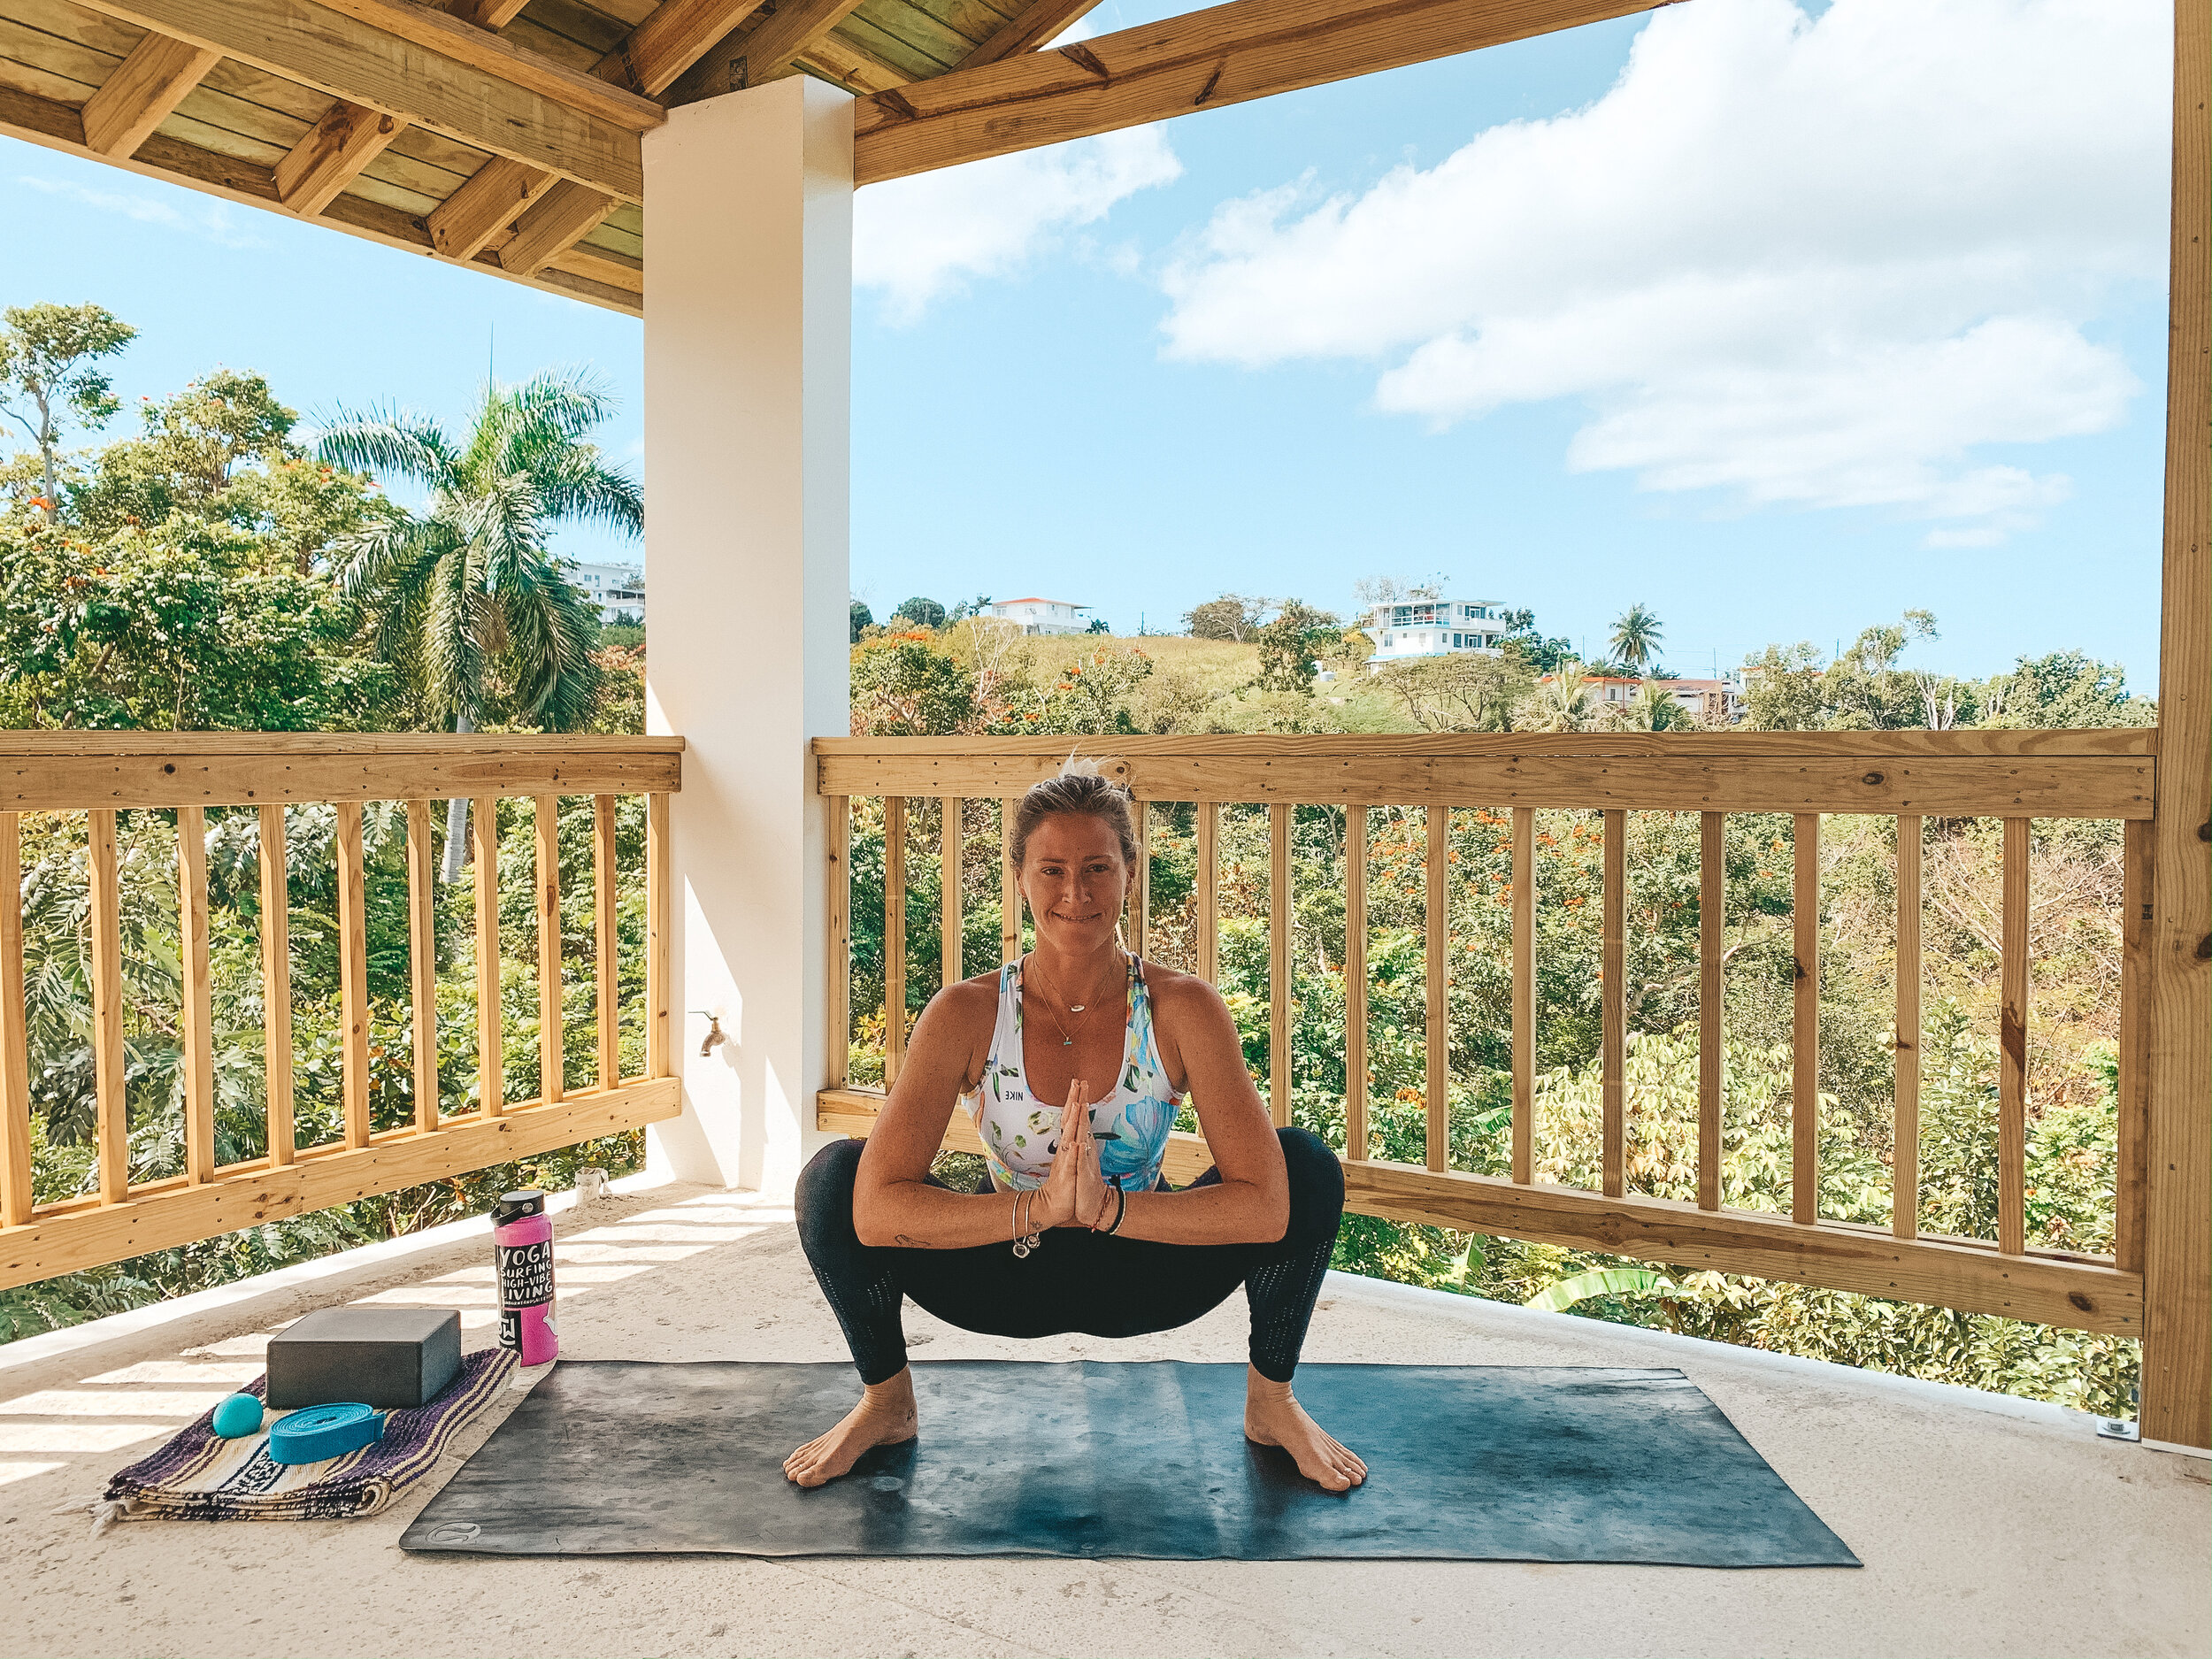
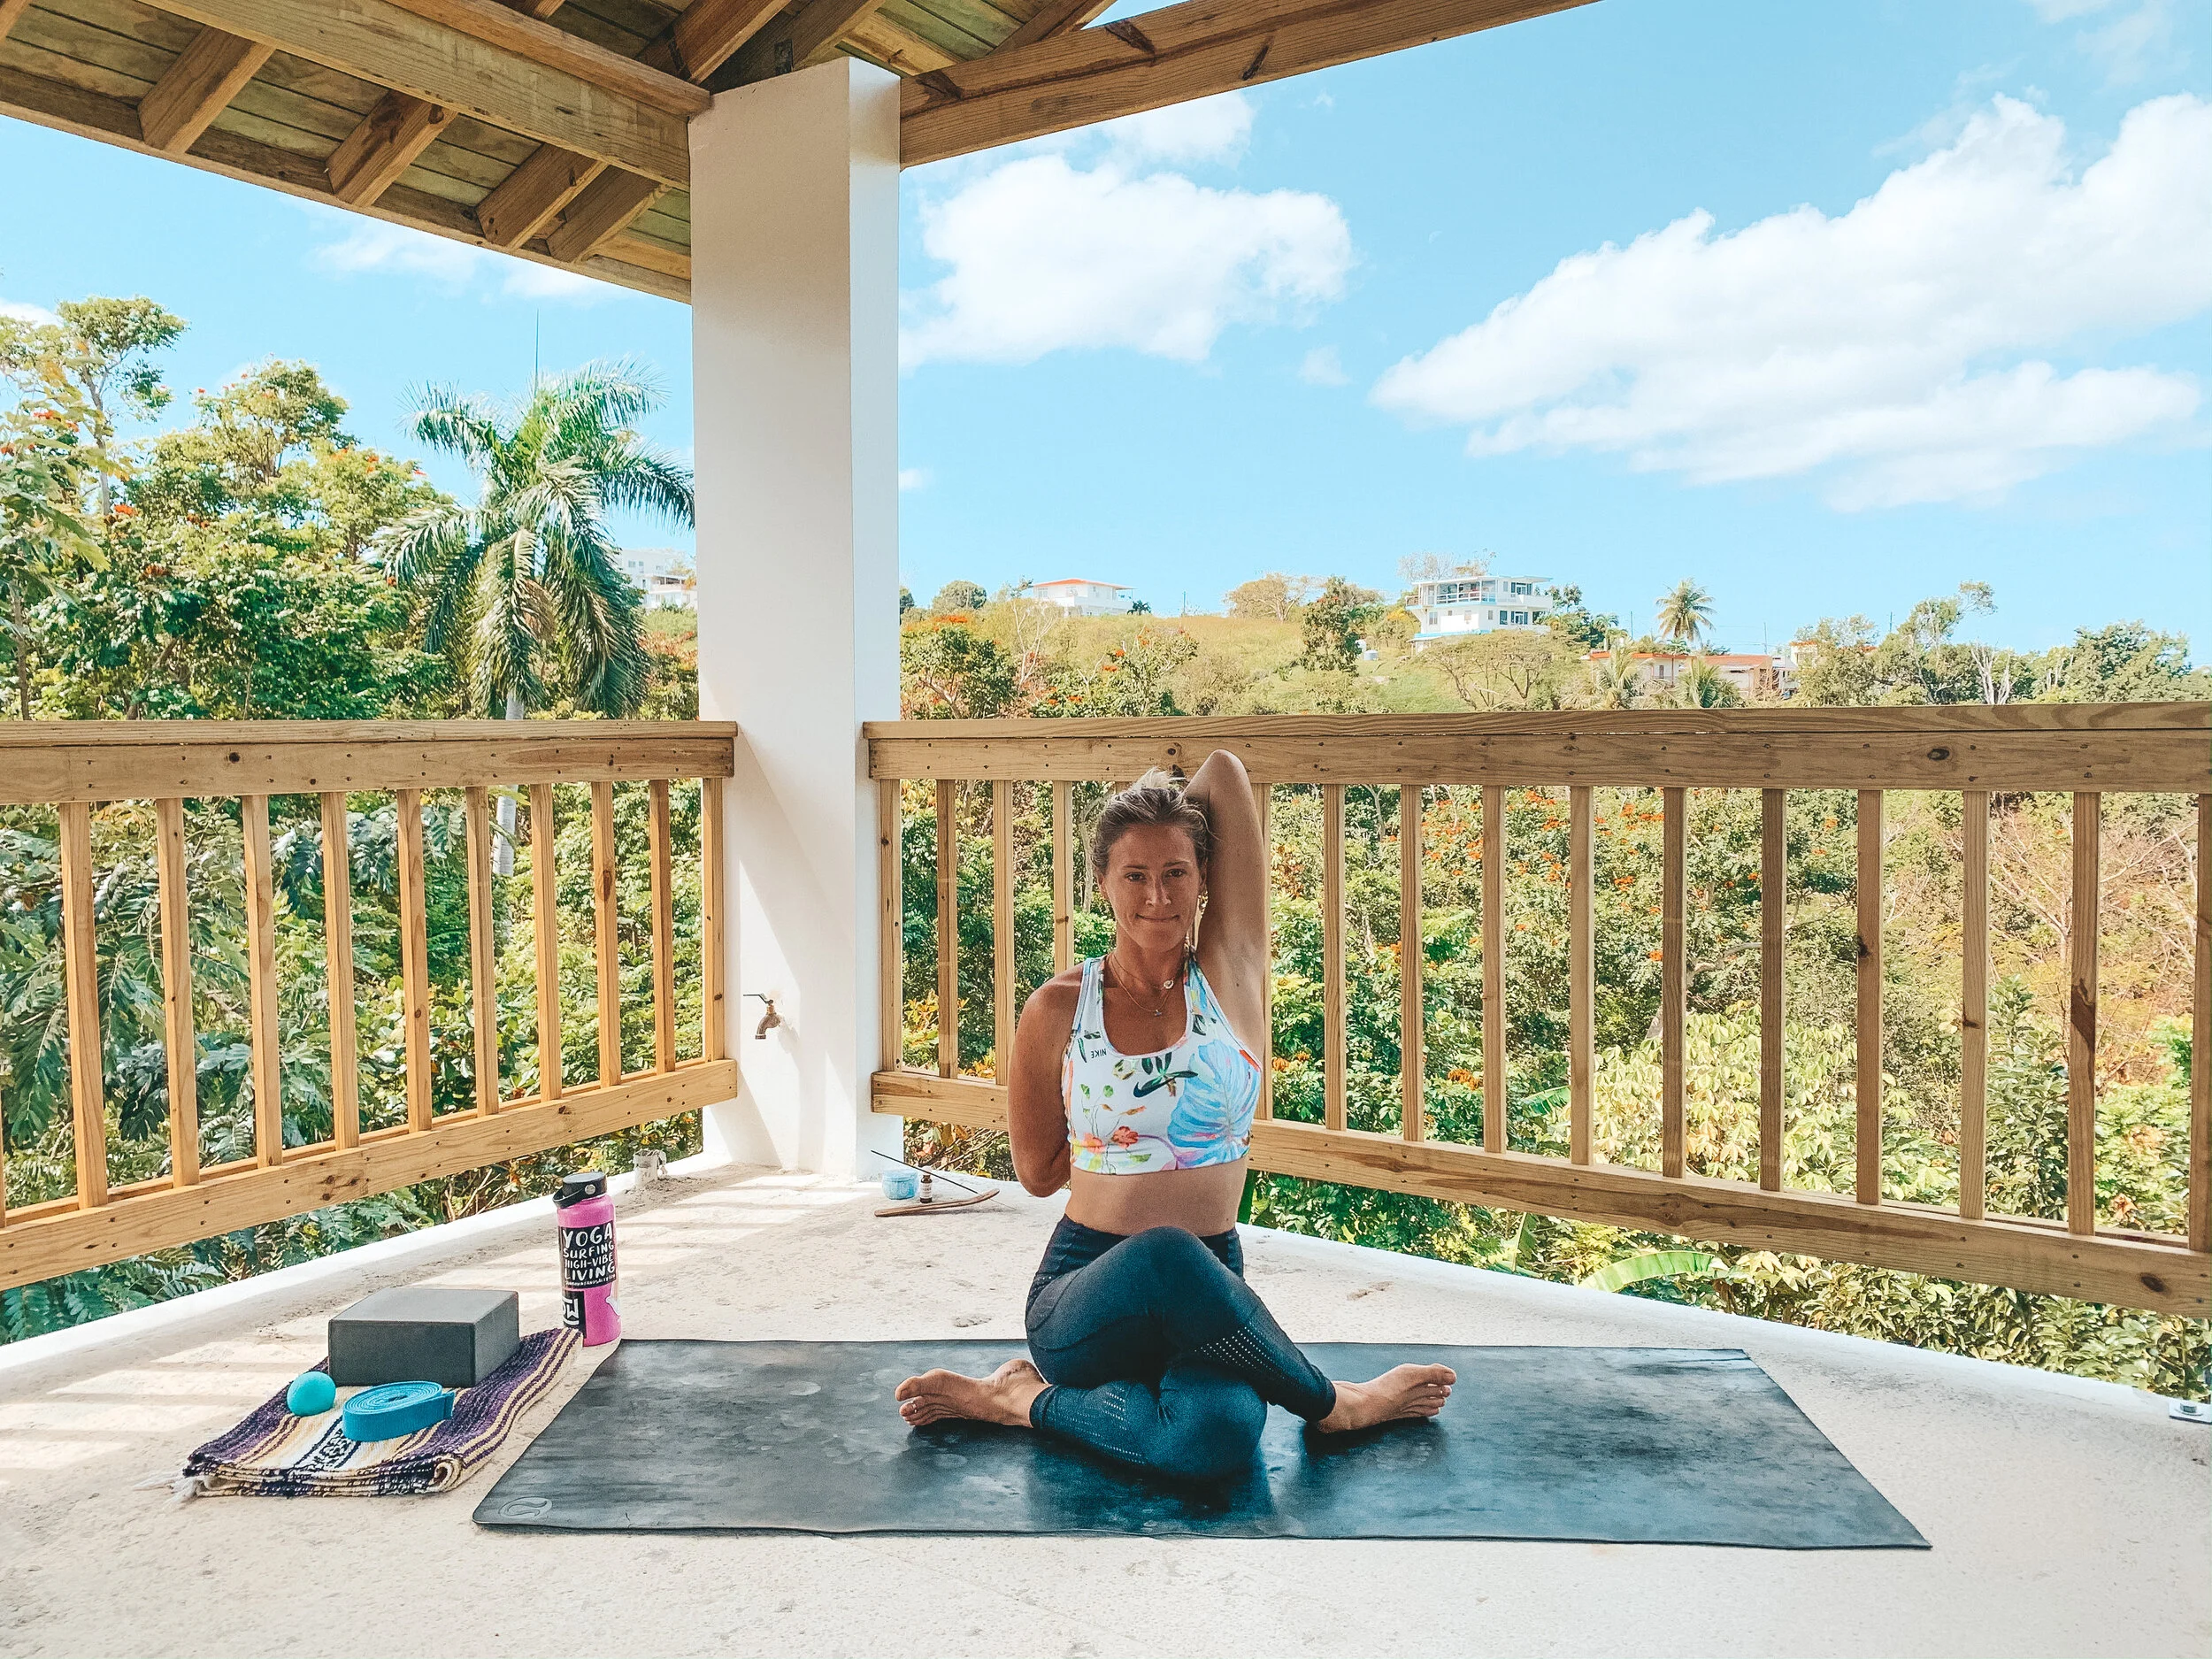
1. Malasana // Garland Pose or a Yogi Squat
Why?? For ankle, knee, and hip mobility.
Bring your feet a little wider than your hips with toes slightly pointing out and heels slightly pointing in.
* I usually like my feet about mat-width distance apart.Keep the knees tracking over the toes as you drop down into your squat.
* If a deep squat without any support (like in Image 1B) feels inaccessible, or like it’s just a little too much - prop a yoga block or pillows underneath your sitting bones to give you some support (like in Image 1A).Bring palms to prayer, or fists to touch, with the elbows connected to the inner thighs or knees.
Allow the sitting bones to drop as you resist the elbows and knees into one another and lift the torso UP out of the hips.
Try to keep the spine long, the heart pointing forward (rather than down), the shoulders off of the ears, and the face & neck relaxed.
Take 5-10 deep breaths here.

(2A) Adho Mukha Svanasana aka Downward Facing Dog Pose aka Downdog
2. Adho Mukha Svanasana // Downward Facing Dog Pose
Why?? It gets into a little bit of everything opening up the back body, the side body, and the chest.
From Malasana, release the hands to the floor, turn the toes forward or slightly in, and lift the hips to take a few breaths in a forward fold (not pictured).
From a forward fold, plant the hands and step the feet towards the back of the mat to come into an upside-down “V” shape with the body.
*Hands about shoulder-width distance apart, feet about hip-width distance apart.
Press firmly into the hands as you stretch the hips up and back - think about getting long from your wrist creases to your hip creases.
Pull your low belly in as you slightly tilt your sitting bones towards the sky. Keep all of that and gently stretch your heels back and down towards the floor.
* A little bend in the knees is totally fine here, you just want to find a gentle stretching sensation through the backs of the legs.Keep grounding evenly through both hands & feet while maintaining a gentle hugging in of the low belly. Allow your neck to soften and your head to drop between your arms.
Take 5-10 deep breaths here.

(3) Anjaneyasana (Lunge Pose) with Garudasana (Eagle Pose) Arms
3. Anjaneyasana with Garudasana Arms // Lunge with Eagle Arms
Why?? The lunge stretches out the hip flexors and the arm bind works into the paddling muscles of the shoulders & UPPER BACK.
From Downdog, step your right foot forward between your hands and gently lower the left knee to the floor - back toes can be tucked, or un-tucked, whatever feels better for you.
Pull your low belly in as you lift your torso off the front leg, reaching the arms to the sky.
Keep the low belly drawing away from the front thigh as you gently melt into the hips, and think about slightly stretching your sitting bones forward towards your front heel.
* Find a place that you can work with, you should feel a stretch through the front of the left thigh and hip - we just want to avoid collapsing or crunching into the low back.Keep all of this and bring your left arm underneath your right arm making a “V” shape with the forearms or wrapping the forearms to connect left fingertips or palm to the right palm or wrist (as seen in Image 3A).
Try to keep the elbows off of the chest and the shoulders off of the ears. You should feel a stretch between the shoulder blades and maybe through the sides of the ribs and tops of shoulders.
* To turn up the sensation, you can drop into the hips as you lift the heart and elbows up towards the sky, coming into a small backbend. I find this expression helps me get more into my lats as well.Stay in your version of this shape for 5 deep breaths before repeating with the left leg forward and the right arm under the left.
* I think it’s nice to spend a few breaths in Downdog between sides.
** Don’t overthink this one. Once again see if you can find an expression of the shape that you can work with, meaning you can stay in the pose for a few deep breaths. Maybe after a couple of deep breaths you notice you can melt a little deeper in?? Explore the shape in your body and pay attention to sensations.

(4A) Vasisthasana or Side Plank
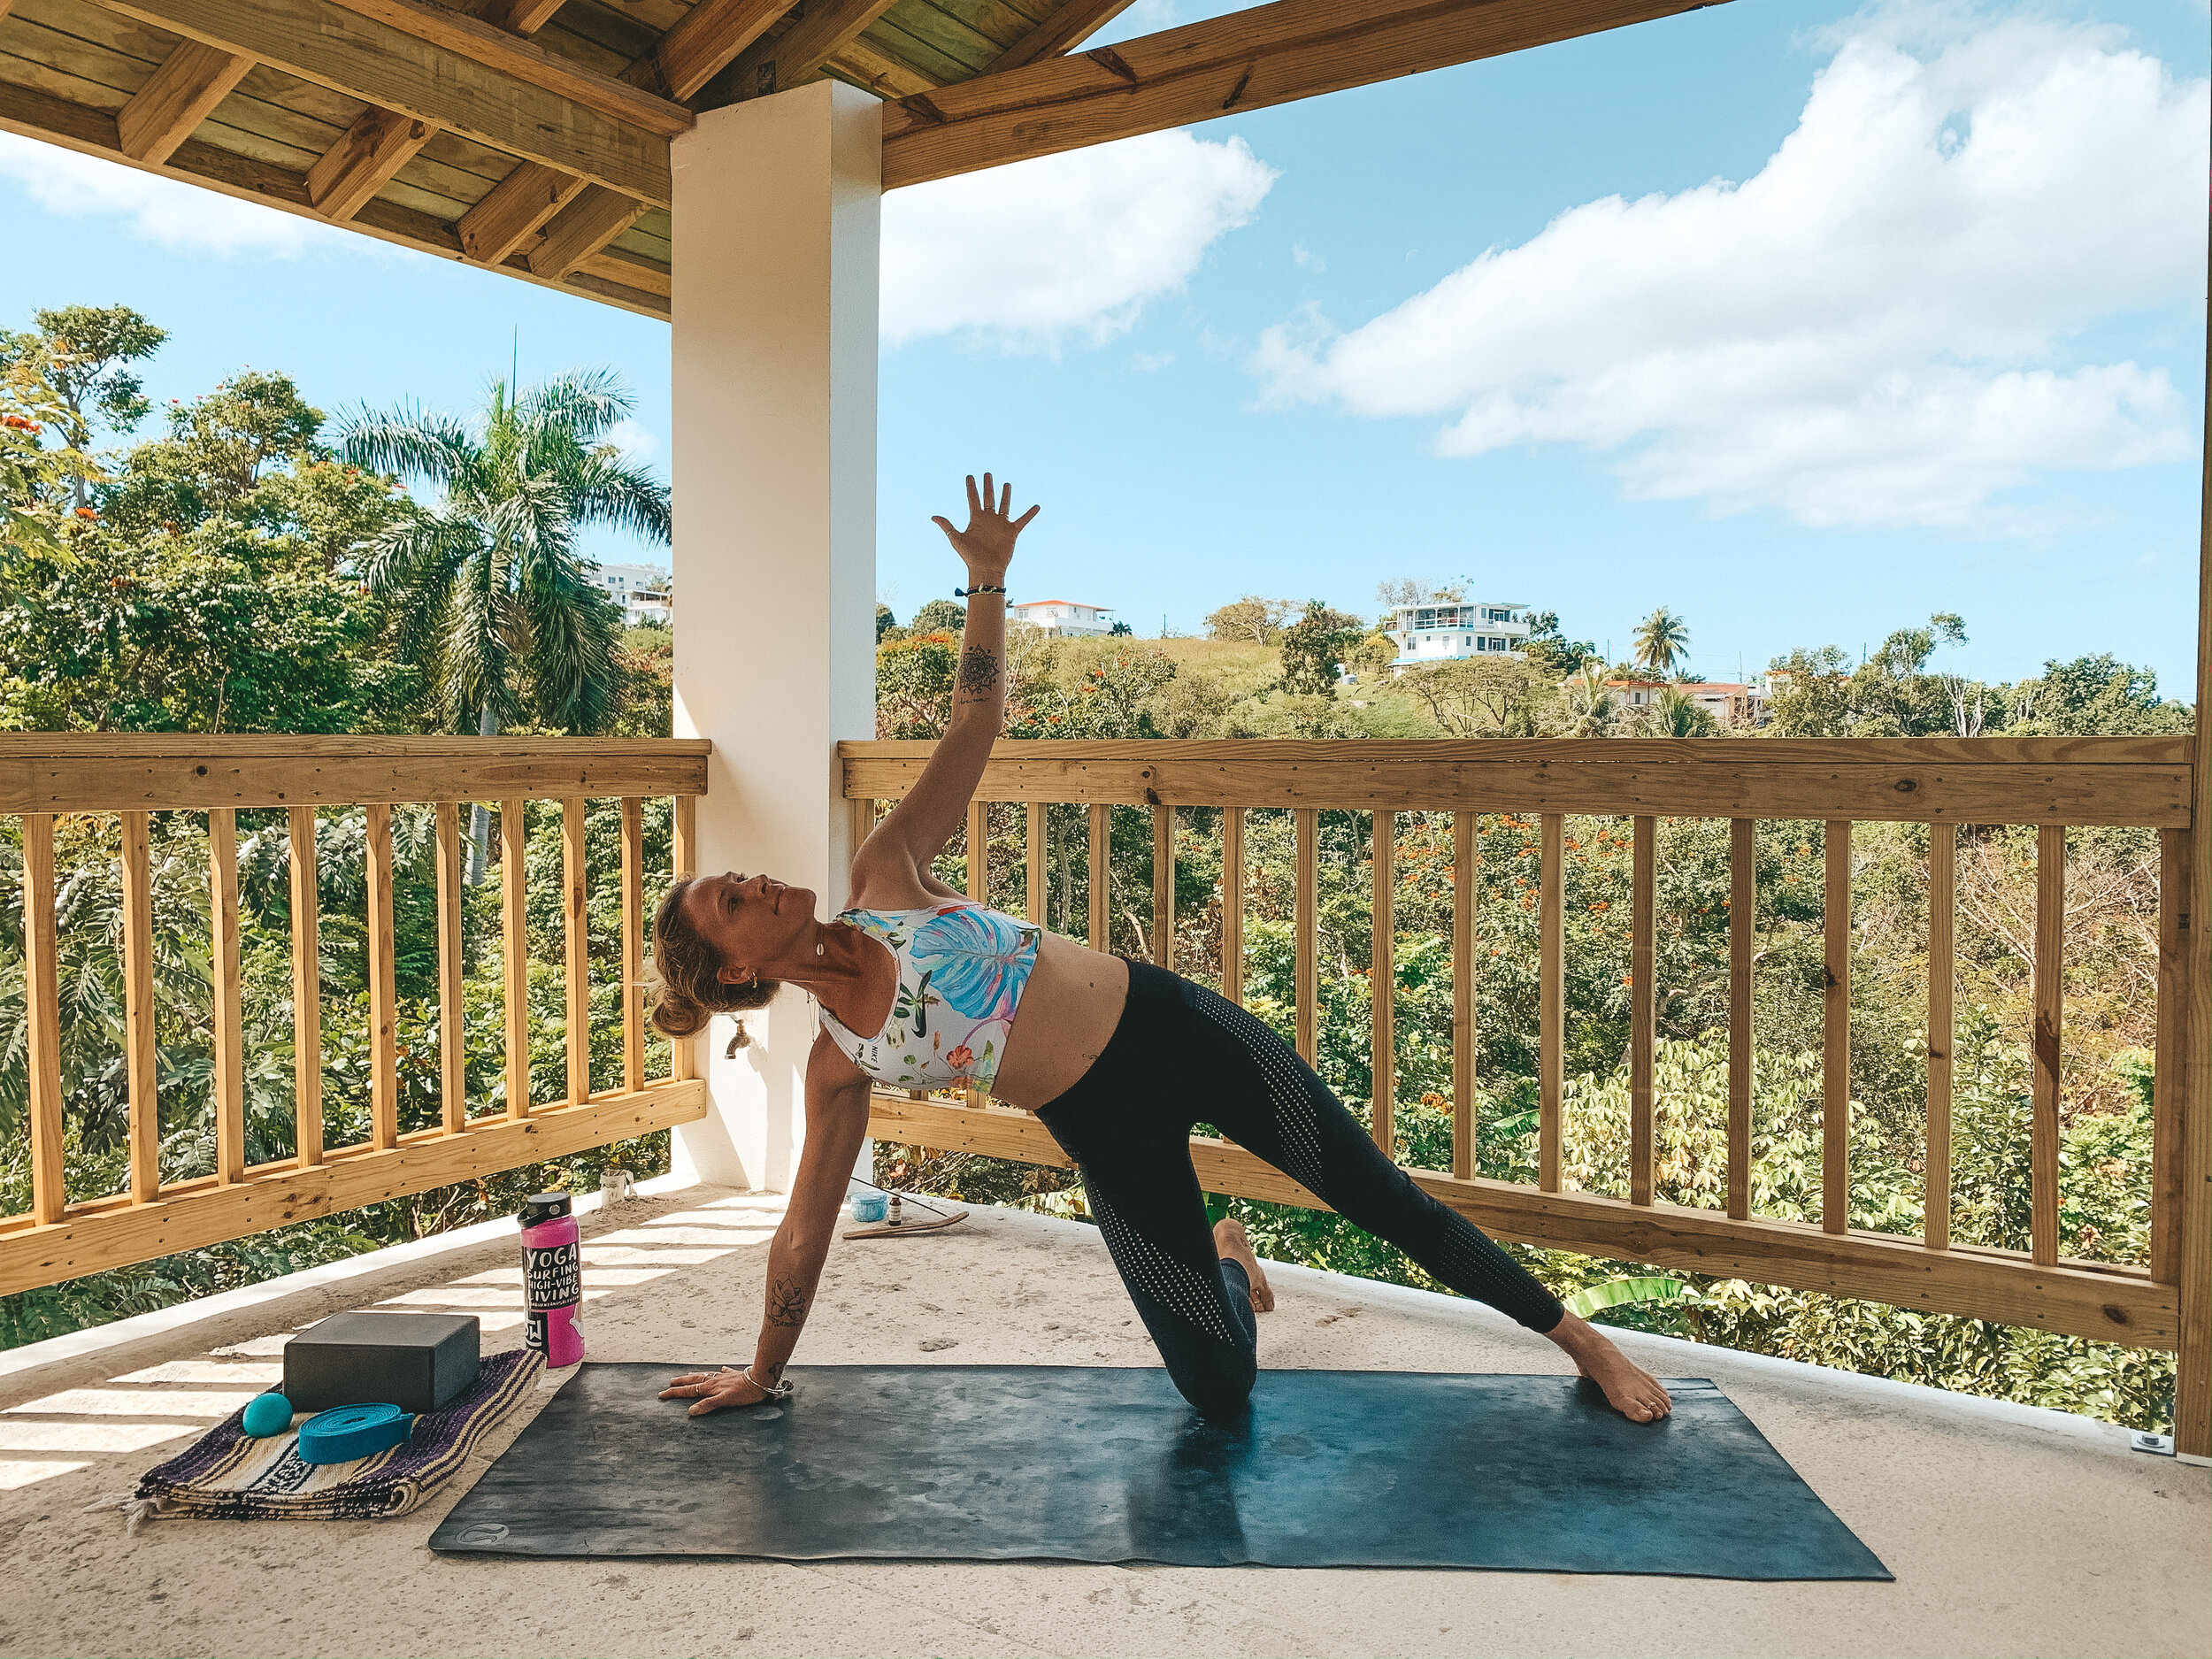
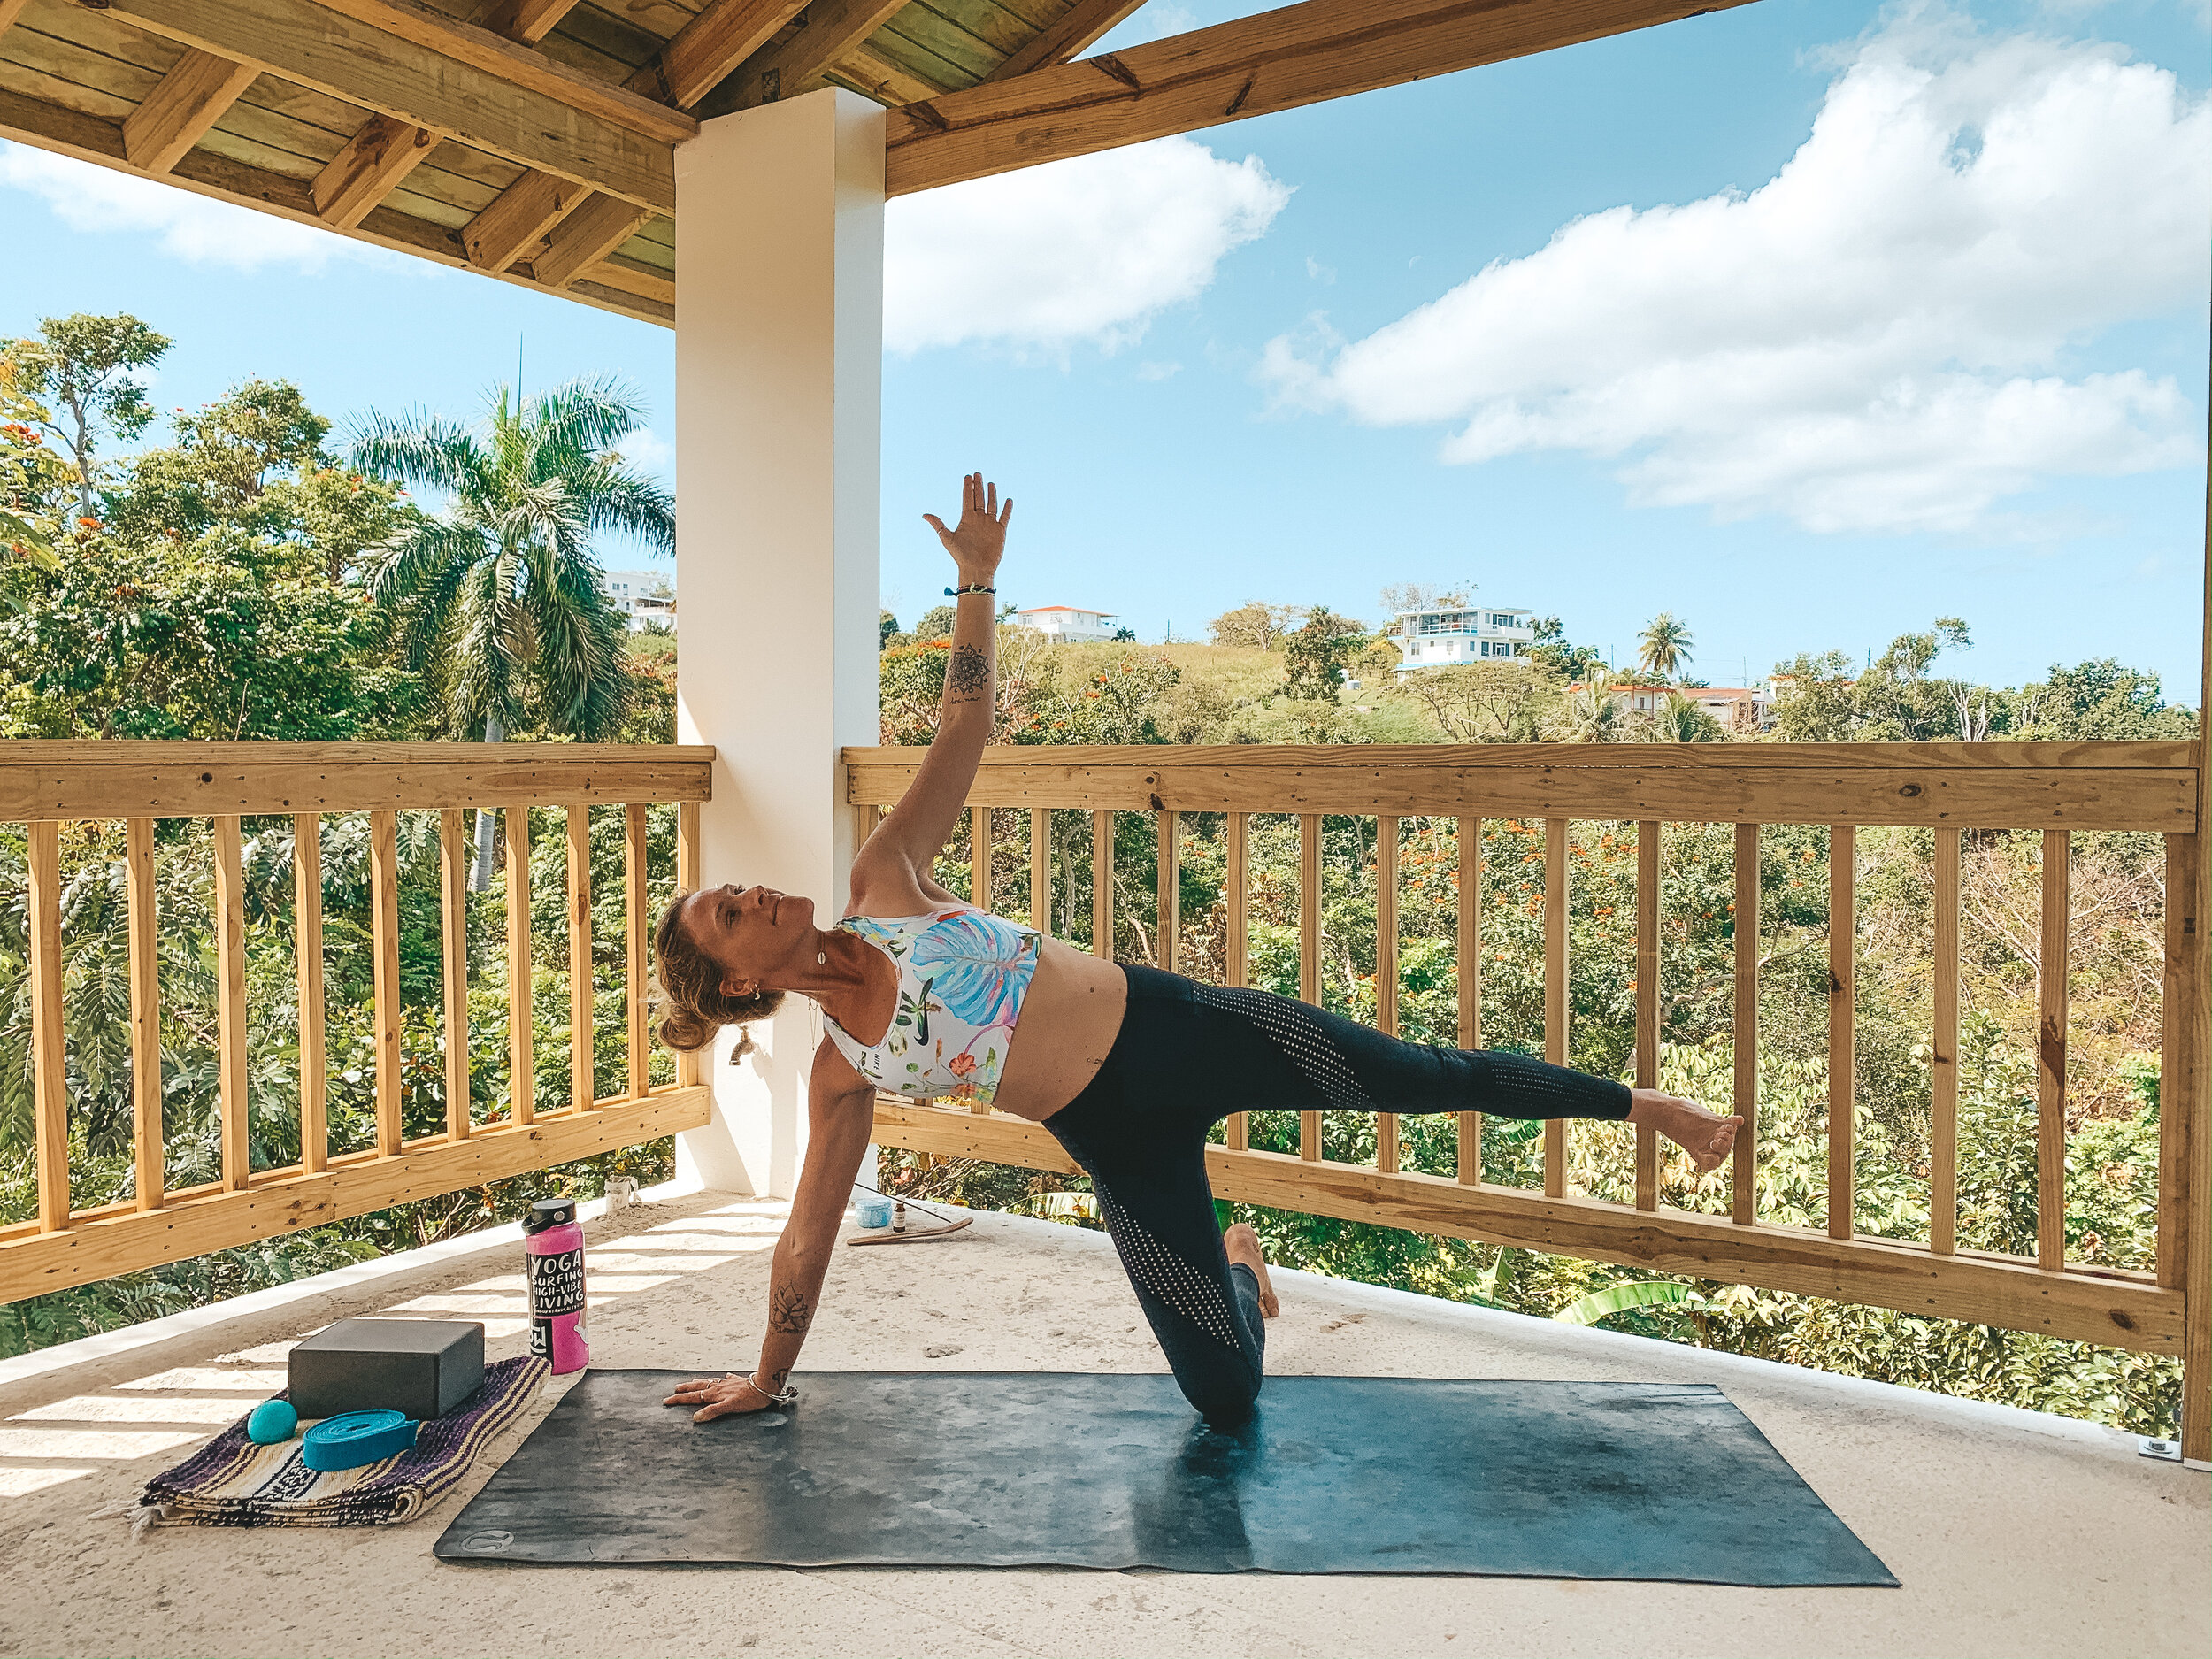
4. Vasisthasana // Side Plank
Why?? Planks in general are awesome to strengthen the body and realign the spine, but I’m a fan of side planks for surfing because they can help to strengthen the rotator cuffs, crucial for the health and stability of the shoulder joint.
From your Crescent Lunge, gently release the hands to the floor and step back to Downdog. Take a breath. Then from Downdog, shift forward into a high plank, like you’re at the top of a push up.
Begin to shift your weight into your right hand as you spin your toes towards the left. This will bring you onto the outer edge of the right foot.
*For full variation you can: Stack left foot on top of right (like in Image 4A) or bring the left foot to the floor in front of the right, or,
**For a modified variation you can: Bring your right knee to the floor and stretch the left leg long (like in Image 4B) or to a hover at hip height (like in Image 4C).
Find a foundation in the bottom hand by spreading your fingers and actively pressing your hand into your mat, as if you were trying to push the floor away from you.
Continue to feel that foundation and integrity work its way up the arm. Point the inner elbow forward, this will create a slight external rotation of the upper arm and begin to turn on the muscles of the rotator cuff to stabilize the shoulder joint, while simultaneously firming the bottom shoulder blade in towards the back of the ribs, this will help stabilize the scapula.
Lift up through the top hand, firm up through the belly and the legs, and think about using the bottom hip to lift the top hip towards the sky.
*Overall this is a very active pose, but see where you can cultivate a little ease, maybe through the face, the neck or the breath.
Stay here for 5 breaths, then slowly come back to High Plank to switch sides.
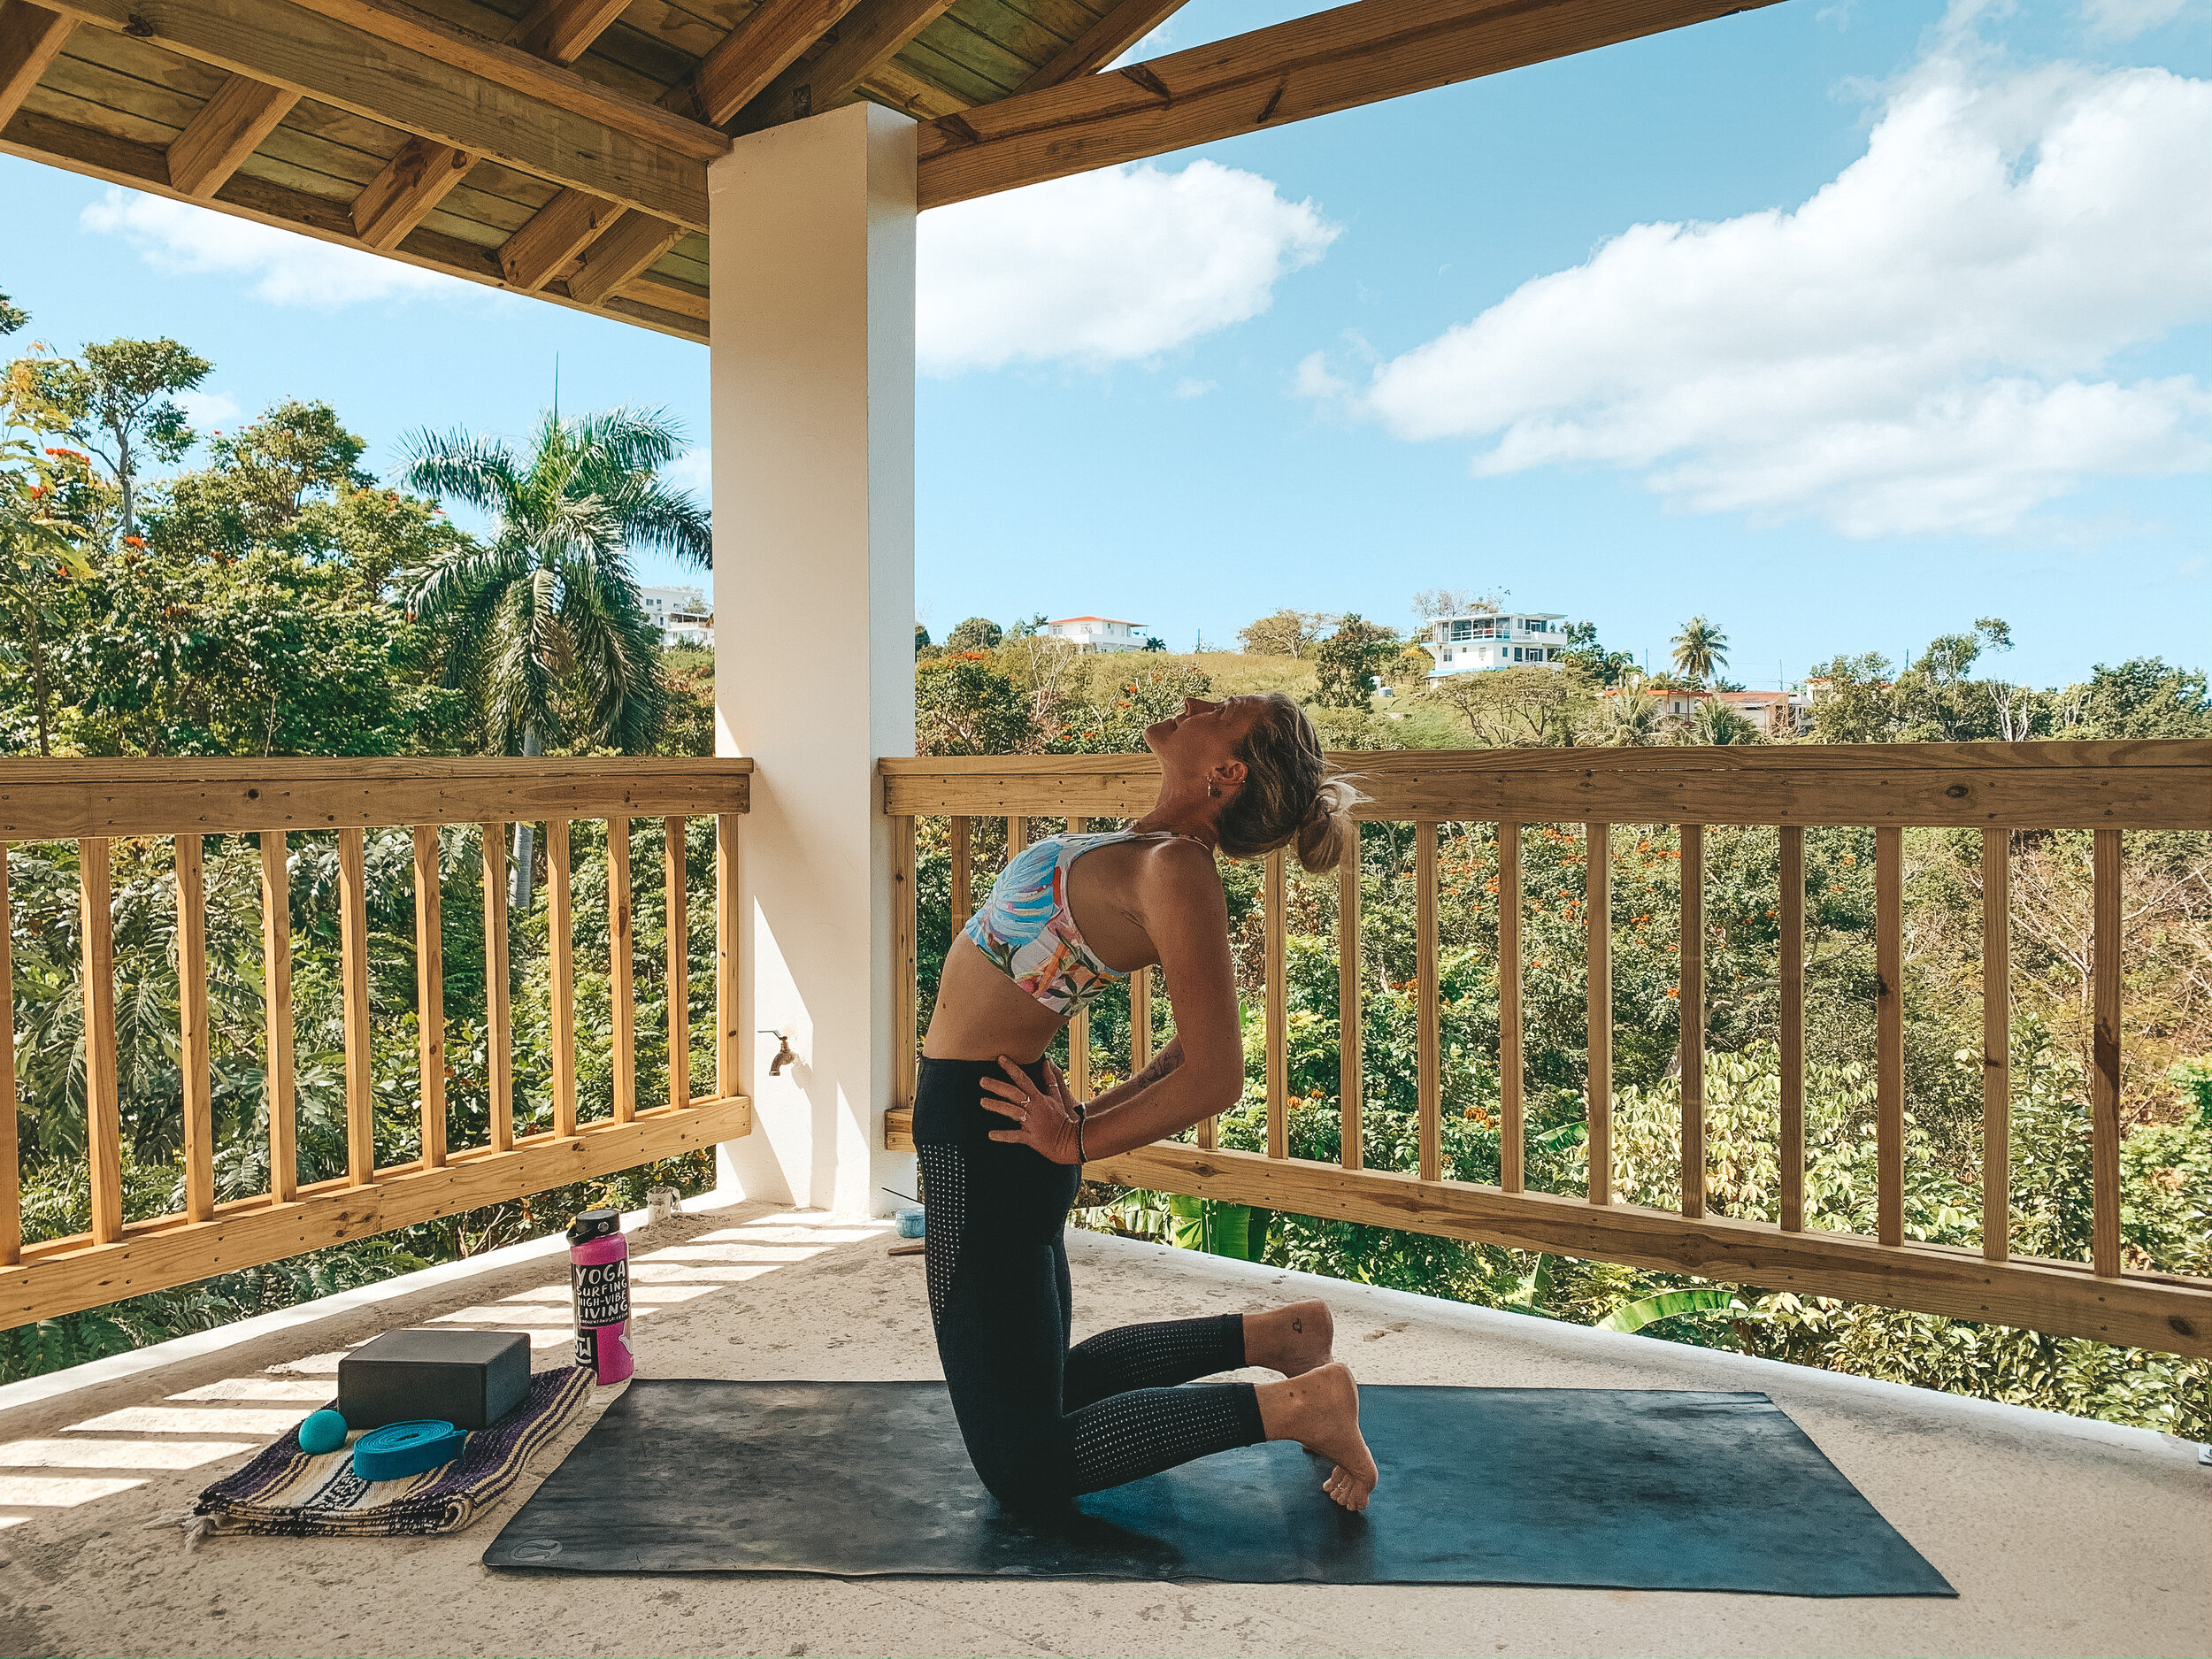
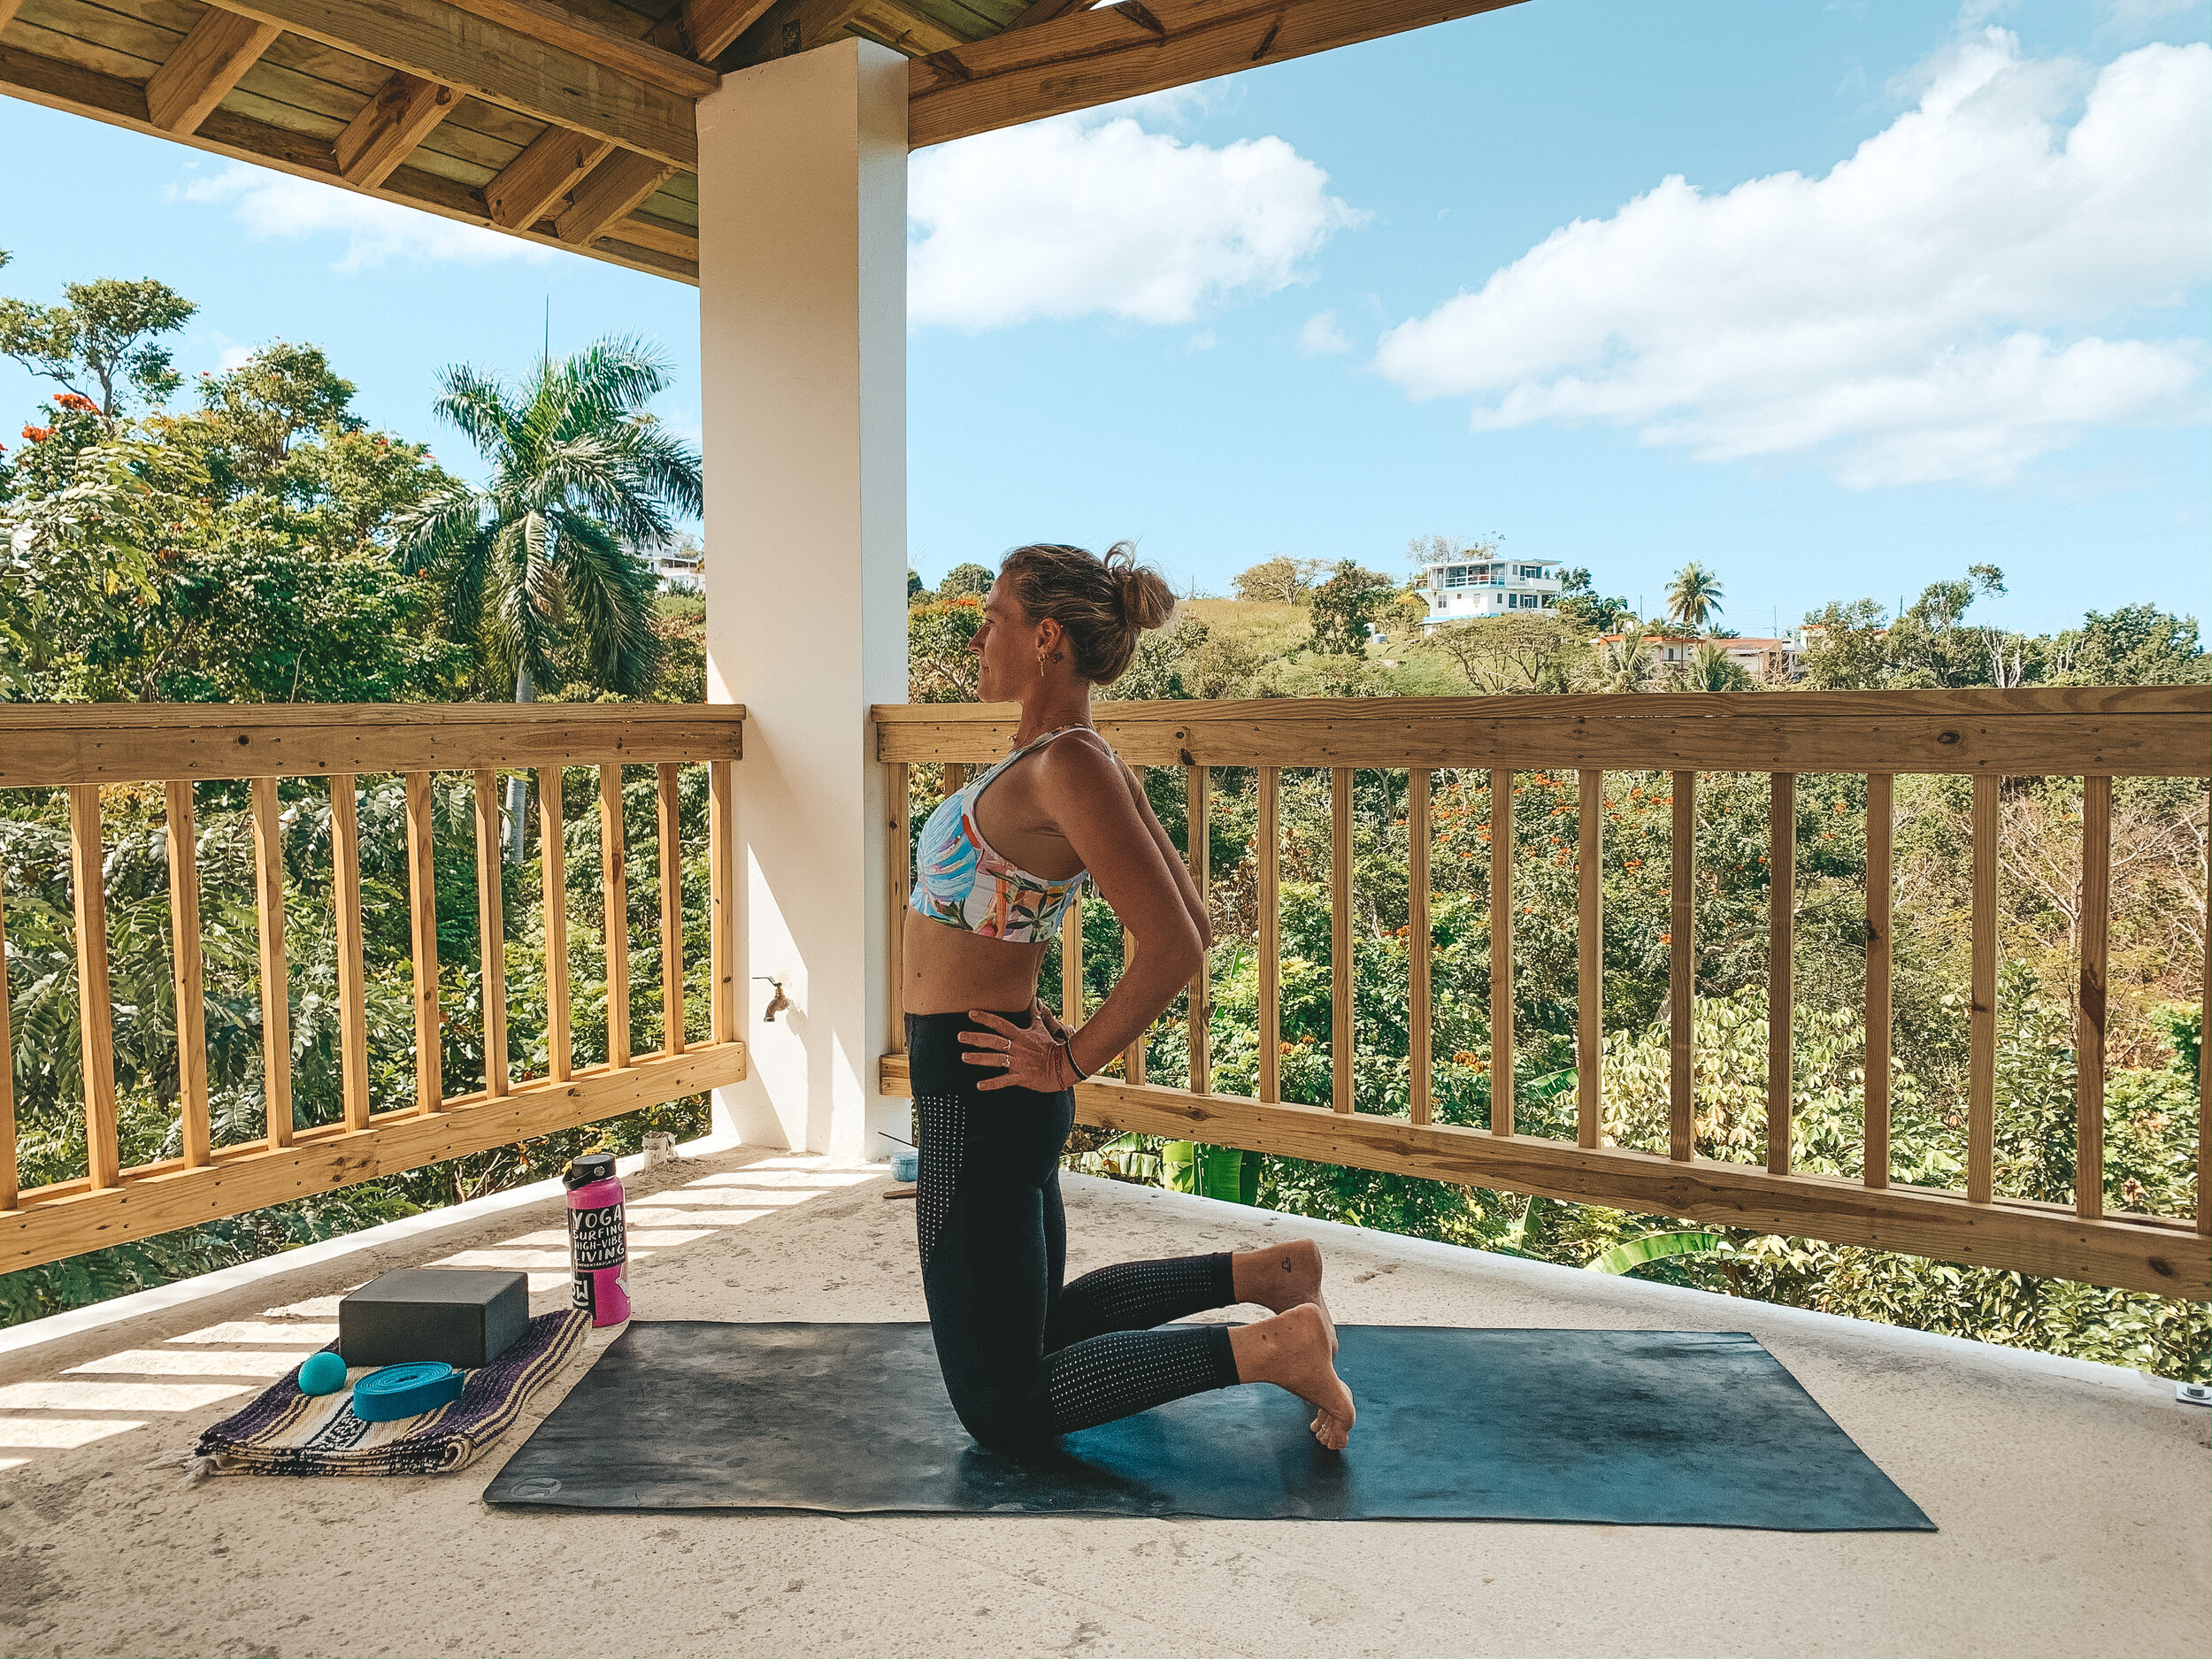
5. Ustrasana // Camel Pose
Why?? It opens up the front body by stretching out the hip flexors, abs, and pecs.
After your final Side Plank, slowly make your way back to Downdog and stay for one breath.
From Downdog, slowly lower your knees to the floor and lift your torso so that the hips stack over the knees.
*Again, toes can be tucked or untucked, whatever you prefer.
Bring your hands to support your low back and gently pull the low belly in towards the spine. Keep this gentle hugging in of your core.
Start to draw your elbows back towards one another and focus on the sensation of the shoulder blades squeezing together to create an opening through the front of the shoulders and the chest.
*This may be enough for you and that’s perfectly fine. If you feel a nice stretch through the front of the body, stay here and breathe (see Image 5B).
If you want to turn up the sensation, keep all of the above, and begin to gently press your hips forward as you lift your ribs up out of the hips and offer your heart towards the sky, taking a slightly deeper back-bend. If this feels OK, you can even let your head drop back to open up through the front of the neck (like in Image 5A).
*If you’d like to continue working deeper in, play with bringing your hands to your heels (not pictured), continuing to focus on lifting the ribs up out of the hips to create space in the low back even ask you bend backwards.
*For surfers, I don’t think the back-bend is as important an aspect as finding that sensation of supported opening through the front body. So don’t worry about how deep into the back-bend you go.
Once again, find an expression that YOU can work with and stay here for 5 deep breaths.
After 5 breaths, slowly release into a Child’s Pose (not pictured), sitting the hips on to the heels and allowing the belly to rest on/between the thighs and the forehead to rest on the floor or on top of the hands. Stay here for a few breaths before transitioning into the final pose.

(6A) Gomukhasana or Cow Face Pose - Front View
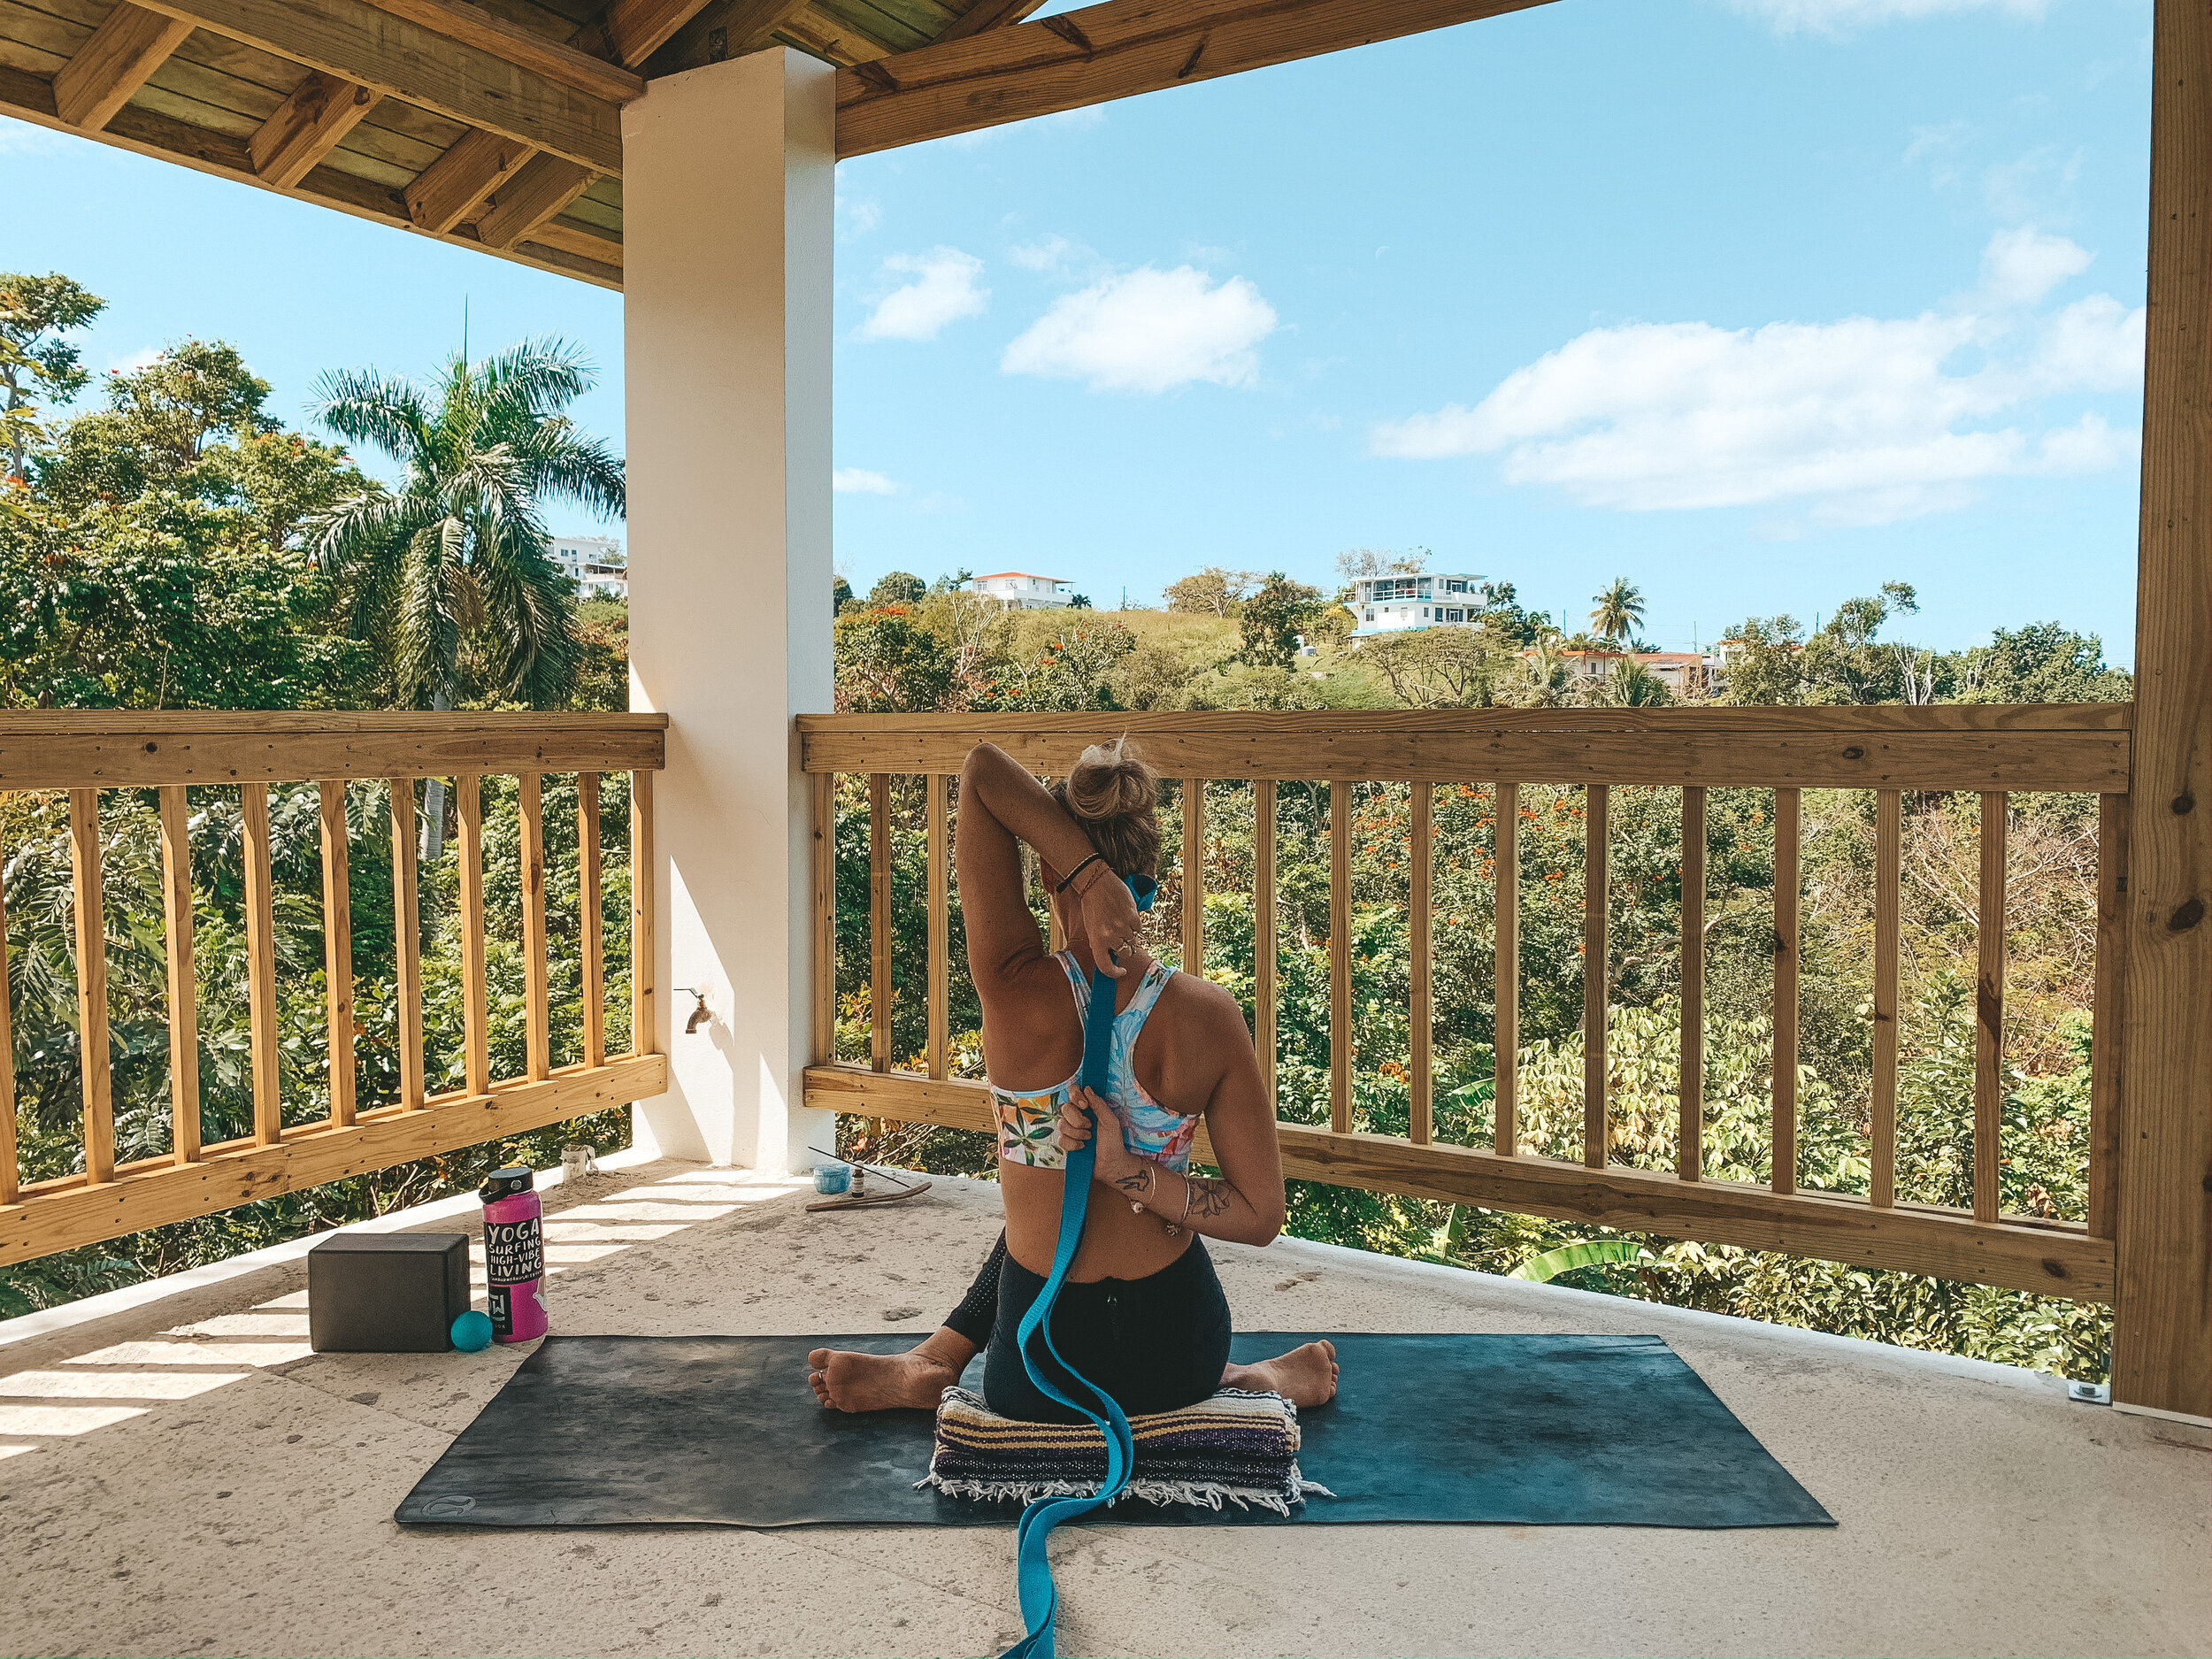
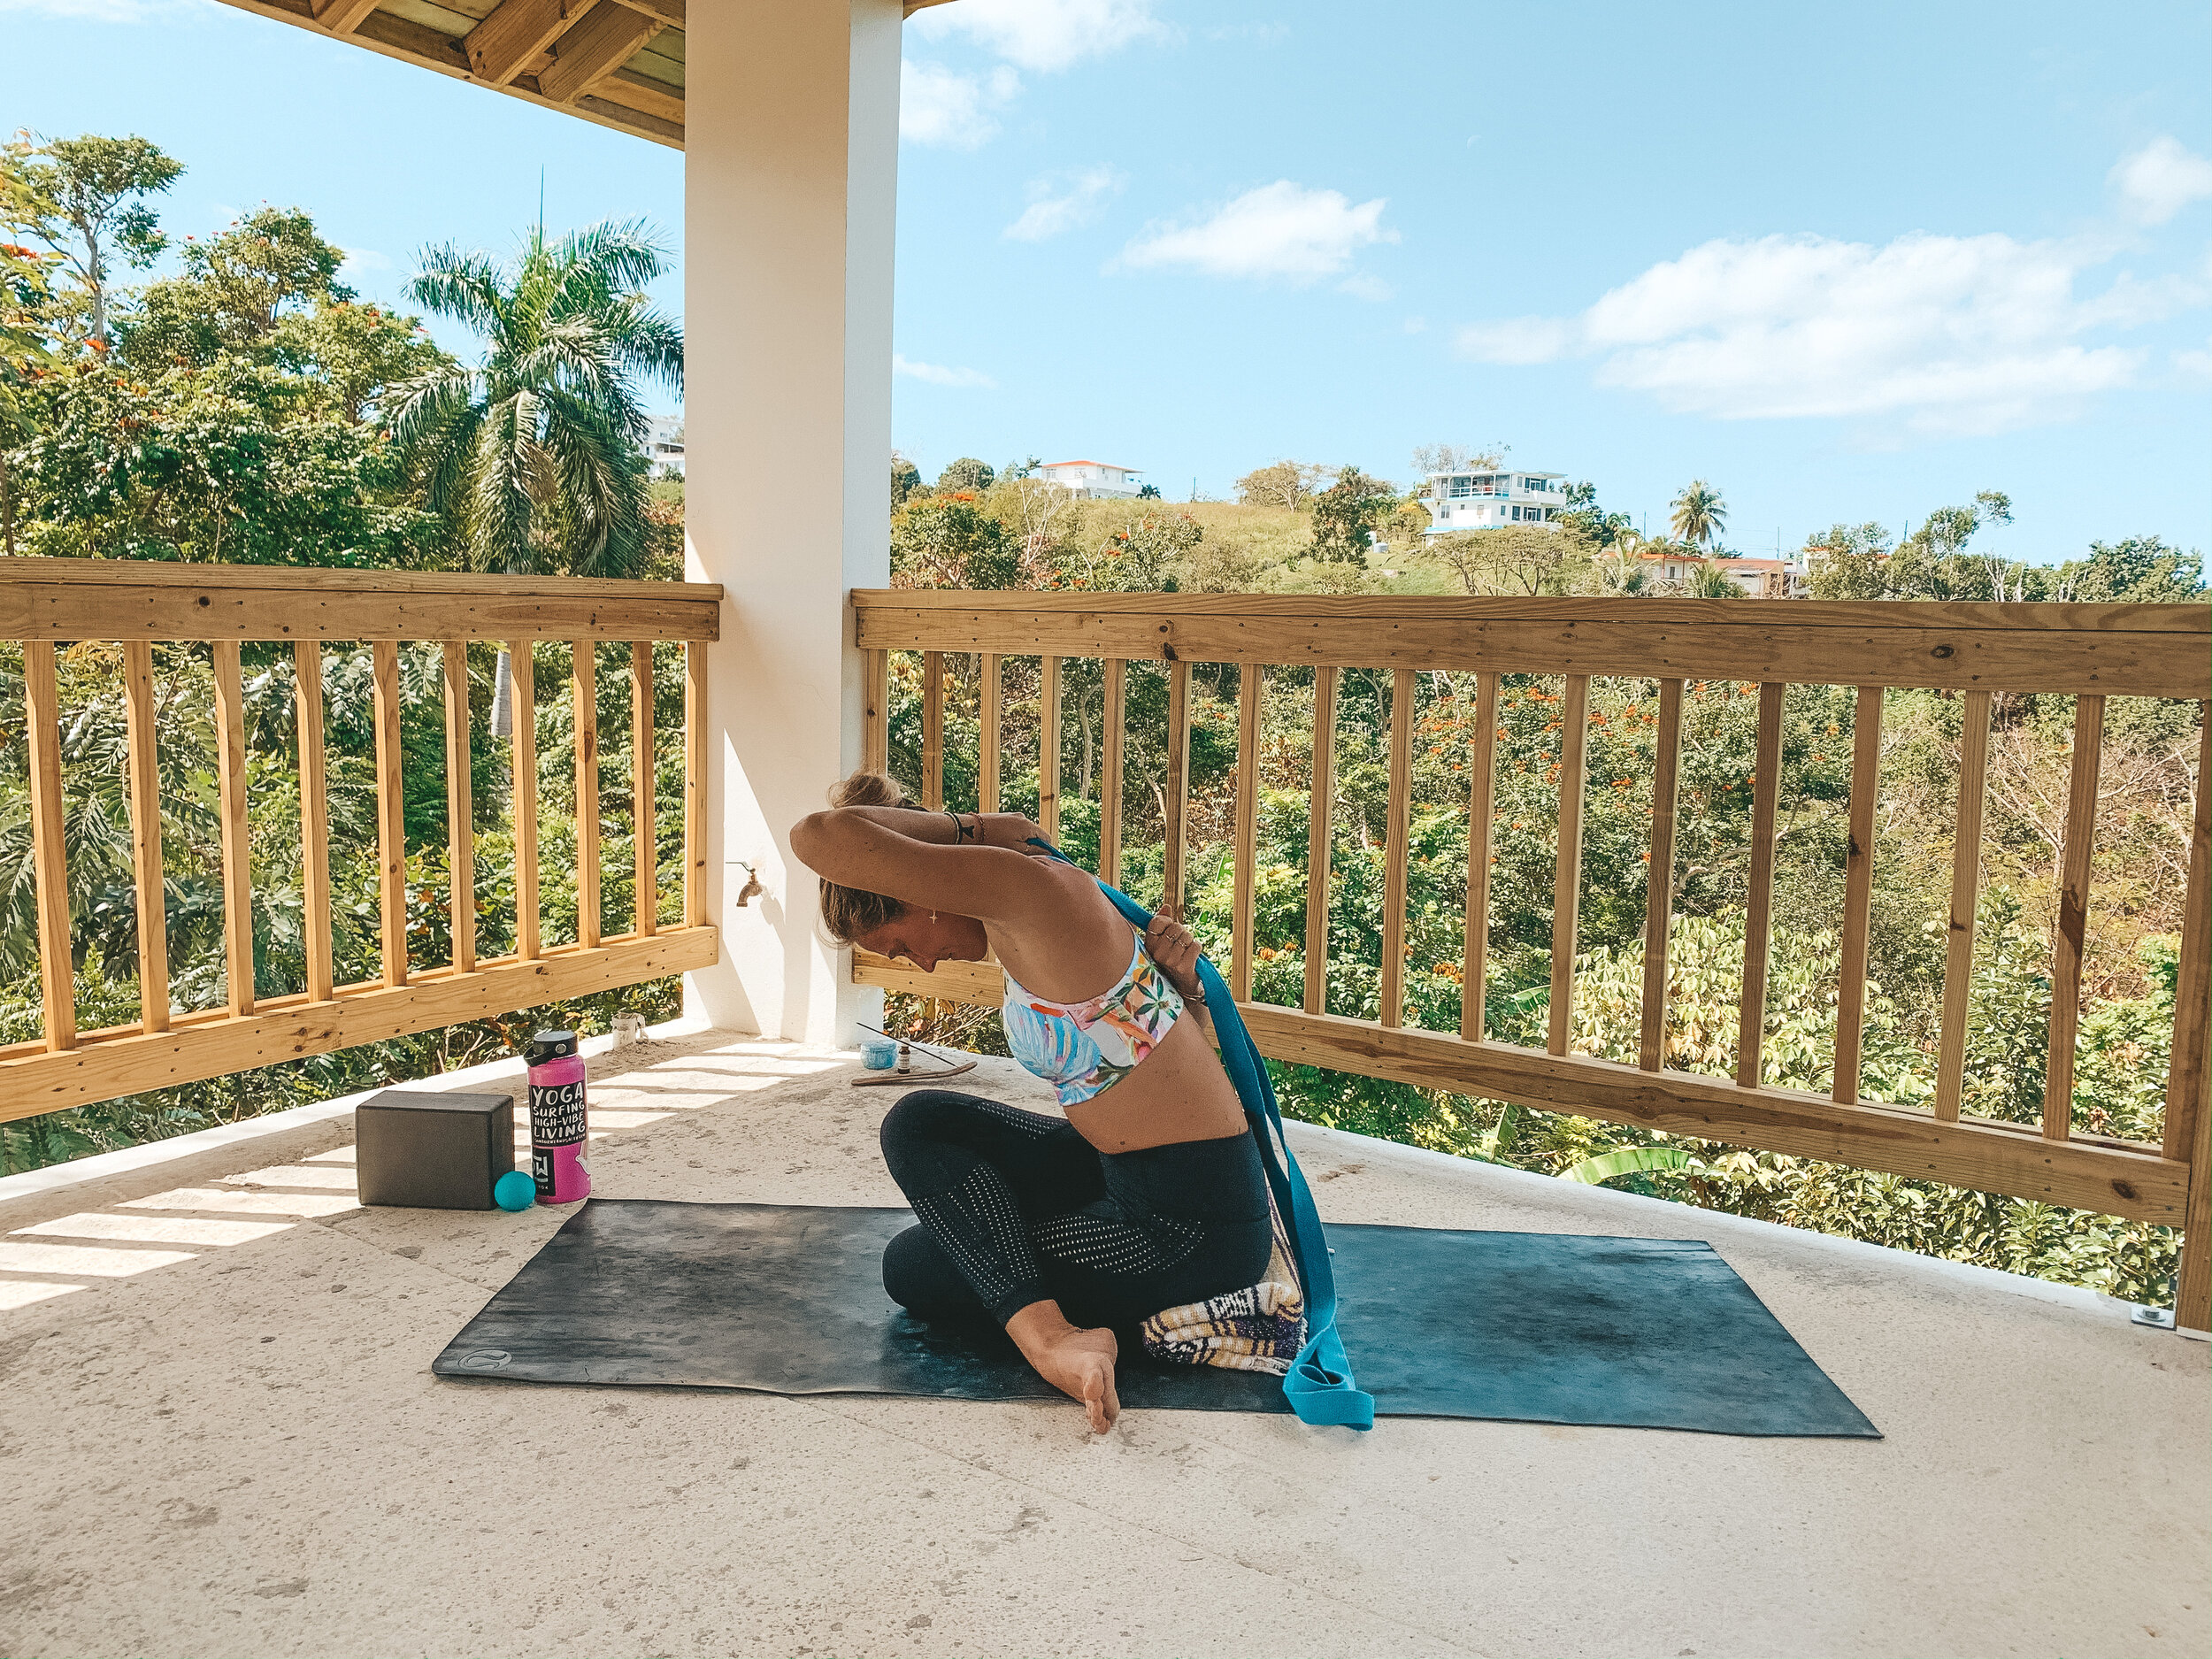
6. Gomukhasana // Cow Face Pose
Why?? Another two-for-one, this pose is a great stretch for the rotator cuffs as well as the outer hips.
After a few breaths in Child’s Pose, gently press yourself up onto hands and knees and come to seated.
Cross your right knee over your left knee and notice that you are sitting somewhat between your heels (like in Image 6A).
*I prefer to sit on a folded up blanket, it gives me a little more room to work with. Once I get settled, I like to bring my ankles a little closer in towards my hips.
Traditionally, knees are stacked, but if all of this feels like it’s a little too much for you, allow your right foot to come outside of the left knee, kind of like Ardha Matsyandrasana (not pictured).
Take a moment to feel both sitting bones get heavy, and see if you can take a few breaths to encourage the outer hips to soften.
For the arm bind, lift the left arm skyward and externally rotate the upper arm bone (so that the shoulder rolls away from the ear), bend the elbow so the palm faces towards the body and gently walk the fingertips down the back (you can use the right hand to help you do this).
Keep that, bring your right arm alongside the body as you internally rotate the upper arm bone (so that the shoulder rolls in towards the body), bend the elbow so that the palm faces away from the body and gently walk the fingertips up the back towards the left hand.
PLEASE NOTE: You DO NOT have to grab hands or even touch fingertips. A yoga strap or a sarong or a towel is a PERFECT tool to make this shape more accessible.
*In fact, it’s my personal preference to use a strap (like in Image 6B).
*The shoulders are already a fairly mobile joint, so we aren’t worried too much about creating more flexibility here, instead we just want to think about creating a suppleness in these muscles.
So find a shape that works for you! Try to keep both upper arm bones in towards the body and both shoulders off of the ears.
*If you want to turn up sensation you can play with a gentle forward fold (like in Image 6C), but try to keep some weight in the sitting bones so you don’t spill all the weight forward onto the knees.
Try to spend 5-8 smooth, slow breaths here. Eventually work your way up to 10 deep breaths.
Take your time coming out of the pose. Feel free to take any counter poses or movements before switching sides. For the second side it will be left knee on top of right with the right arm being the top arm and left arm being the bottom arm.
It’s also interesting here to take note of any differences from side to side. If one side has a significant difference in range of motion maybe spend a few extra breaths there to encourage more balance in the tissues.